Introduction
Kinderlogo activities use a version of Terrapin Logo that runs in a browser. There are many different browsers for many different devices: Chrome, Firefox, Brave, Edge, Safari, and Silk, to name a few. We have tried to test Kinderlogo in as many setups as possible.
This page helps point you in the right direction to make using Kinderlogo with small children as seamless as possible. If you are experiencing a different problem, please contact Terrapin. Doing so may allow the issue to be resolved for you and other users. Please be very specific when describing what you are experiencing.
Note that Kinderlogo is not designed for phones, as students need to type on a physical keyboard on a device with a larger screen. Kinderlogo will run on tablets, such as an iPad or Kindle, if an external keyboard is attached. Please see the section below on using Kinderlogo on a tablet.
Kinderlogo will generally work well without any fine-tuning. But there are five areas that you may need to look at to ensure that activities run smoothly in your classroom. You only need to make these adjustments once; then they will work for all activities.
- Using Kinderlogo on a Tablet
- Enabling JavaScript
- Allowing Pop-ups
- Allowing Sounds to Autoplay
- Managing Downloads
- Adjusting Key Repeat Settings
Using Kinderlogo on a Tablet
Kinderlogo has been tested on iPads and Kindle Fires from Amazon. Some of the activities have been adjusted from the original activities designed for use on devices with a larger screen, such as Macs, PCs, and Chromebooks. However these adjustments are applied automatically because Kinderlogo can detect the screen size of the device in use and use separate code to make the activity work on a smaller screen.
Here are tips for using Kinderlogo on a tablet:
- To use the activities, an external keyboard is required. Kinderlogo commands are given using letter commands, and an onscreen keyboard takes up too much space on the screen to be useful. Kindles and iPads have Bluetooth capability, and so an inexpensive Bluetooth keyboard is adequate. A Bluetooth keyboard generally runs about $10–$15. Make sure that Bluetooth is turned on and that the keyboard is charged and turned on. Go to the Bluetooth setting on your tablet and it will automatically search for available Bluetooth-enabled devices. When it finds the keyboard, click on its name to pair it. If the keyboard is already paired to a different tablet, you will need to first unpair it from that device.
- For a few activities, you will need to rotate the tablet to portrait mode so that all the parts of the activity are visible. These activities will notify you when this action is needed.
- Images that are saved using the * (Shift+8) command are stored in the tablet’s Downloads folder.
- iPads support turning Key Repeat on and off and adjusting related settings. Please refer to the “Adjusting Key Repeat Settings” section below.
- On an iPad, you will need to allow Pop-ups. Please refer to the “Allowing Pop-ups” section below.
Enabling JavaScript
The Kinderlogo activities are written in Terrapin Logo. But, they use JavaScript to load the Terrapin Logo file, so your browser will need to have JavaScript enabled. Here’s how to find out if your browser has JavaScript enabled.
Chrome for Windows, Macs, and Chromebooks:
JavaScript is generally enabled for Chrome users. You can check if it is by following these steps:
- From the menu at the upper right of the window (the three vertical dots), choose ‘Settings’.
- Click ‘Privacy and Security’ at the left.
- Click ‘Site Settings’ in the main window.
- Scroll down to ‘Content’.
- If you see
JavaScript: Sites can use JavaScript, you are all set.
If it says that sites cannot use JavaScript, you can make an exception for Kinderlogo.
Click ‘Add’ next to ‘Allowed to use JavaScript’.
In the text field, type [*.]terrapinlogo.com.
Doing this will cover all Kinderlogo activities.
Safari for Macs:
- Click the menu name Safari at the upper left of the window.
- Select ‘Preferences’.
- Click on ‘Security’.
You will see the label ‘Web Content’. Check the box for Enable JavaScript, if it is not already checked.
Firefox for Windows and Macs:
JavaScript is enabled by default.
Brave for Windows:
- From the menu at the upper right of the window (the three horizontal lines), choose ‘Settings’.
- Click ‘Privacy and Security’ at the left.
- Click ‘Site and Shields Settings’ in the main window.
- Scroll down to ‘Content’.
- If you see
JavaScript: Sites can use JavaScript, you are all set.
If it says that sites cannot use JavaScript, you can make an exception for Kinderlogo.
Click ‘Add’ next to Allowed to use JavaScript.
In the text field, type [*.]terrapinlogo.com.
Doing this will cover all Kinderlogo activities.
Edge for Windows:
JavaScript is enabled by default. To check it, do the following:
- Click the Edge menu (three horizontal dots) at the right side of the window.
- Choose ‘Settings’.
- Choose ‘Cookies and Site Persmissions’.
- Under ‘All Permissions’, look for JavaScript.
If it says ‘Allowed’, you are all set. Otherwise, you can add the Kinderlogo site.
To do this, click on the JavaScript setting, choose ‘Add’ after Allow and type: [*.]terrapinlogo.com.
Allowing Pop-ups
Because clicking on a Kinderlogo activity from the Student Center opens the activity in a new tab, some browsers consider it to be a pop-up and might block it.
Here is how to allow pop-ups for Kinderlogo in popular browsers.
Chrome for Windows, Macs, and Chromebooks:
This isn’t generally an issue for Chrome, but if you see a message that the new tab for an activity is blocked, you can do this:
- Start any Kinderlogo activity.
- From the menu at the upper right of the window (the three vertical dots), choose ‘Settings’.
- Click ‘Privacy and Security’ at the left.
- Click ‘Site Settings’ in the main window.
- Scroll down to ‘Content’.
- Look for ‘Pop-ups and redirects’.
If it says Don't allow sites to send pop-ups or redirects, you can change the setting for Kinderlogo.
Click ‘Add’ next to Allowed to send pop-ups and redirects.
In the text field, type [*.]terrapinlogo.com.
Doing this will cover all Kinderlogo activities.
Safari for Macs:
- Log in to Kinderlogo.
- Click the menu name Safari at the upper left of the window.
- Select ‘Preferences’.
- Click on ‘Websites’.
- Select ‘Pop-Up Windows’ on the left side.
You will see a list of currently open windows. Select pub.terrapinlogo.com and choose Allow.
Firefox for Windows and Macs:
Kinderlogo generally works without change its pop-up setting.
However, if the activities don’t load properly, they may be blocked and you can do the following:
- From the menu at the upper right of the window (the three horizontal lines), choose ‘Settings’.
- Click ‘Privacy and Security’ at the left.
- Scroll down to ‘Permissions’ in the main window.
If Block pop-up windows is checked, you can add Kinderlogo as an exception.
Click ‘Exceptions’ and type ‘pub.terrapinlogo.com’ in the text box.
Brave for Windows:
Kinderlogo activities generally work without changing its pop-up setting.
However, if the activities don’t load properly, they may be blocked and you can do the following:
- From the menu at the upper right of the window (the three horizontal lines), choose ‘Settings’.
- Click ‘Privacy and Security’ at the left.
- Click ‘Site and Shields Settings’ in the main window.
- Scroll down to ‘Content’ in the main window.
If it says ‘Don’t allow sites to send pop-ups or redirects’, click the option to add Kinderlogo.
Click ‘Add’ next to Allowed to send pop-ups and redirects.
In the text field, type [*.]terrapinlogo.com.
Doing this will cover all Kinderlogo activities.
Edge for Windows:
Kinderlogo activities generally work without changing its pop-up setting.
However, if the activities don’t load properly, they may be blocked and you can do the following:
- Click the Edge menu (three horizontal dots) at the right side of the window.
- Choose ‘Settings’.
- Choose ‘Cookies and Site Persmissions’.
- Under ‘All Permissions’, look for ‘Pop-ups and redirects’.
If it says ‘Blocked’, click the option to add Kinderlogo.
Click ‘Add’ next to Allow.
In the text field, type [*.]terrapinlogo.com.
Doing this will cover all Kinderlogo activities.
Allowing Sounds to Autoplay
When students are using Kinderlogo activities that play sounds, they may encounter this message on the screen.

They can click the window and the message will go away, allowing the sound to play. However, this can be confusing to students and an impediment to non-readers, as the message appears each time they run a different Kinderlogo activity.
Fortunately, there is a way to automatically allow sounds to play instead of requiring students to dismiss this message.
The sound in the Kinderlogo activities isn’t critical. It is generally a short tune that plays upon successful completion of an activity’s goal. However, the Musical Keyboard, a Kinderlogo Extras activity, does need to have sound available for it to be of use to students.
Note that Kinderlogo never plays videos.
Here is how to allow sound to automatically play in popular browsers.
Note that some instructions below ask you to click the padlock in front of the address line. It looks like this:

Chrome for Windows, Macs, and Chromebooks:
Sound is automatically allowed.
To change this, click the padlock in front of the address line and you can adjust the sound setting.
Safari for Macs:
- Start any Kinderlogo activity.
- Click the menu name Safari at the upper left of the window.
- Select ‘Preferences’.
- Click on ‘Websites’.
- Select ‘Auto-play’ on the left side.
You will see a list of currently open windows. Select weblogo.terrapinlogo.com and choose Allow All Auto-Play.
This will now apply to all Kinderlogo activities.
Firefox for Windows and Macs:
- Start any Kinderlogo activity.
- Select ‘Page Info’ from the Tools menu.
- Click ‘Permissions’.
- Look for ‘Autoplay’.
- Uncheck ‘Use Default’ and check ‘Allow Audio and Video’.
- Close the Page Info window. This will now apply to all Kinderlogo activities.
Brave for Windows:
Sound is automatically allowed.
To change this, click the padlock in front of the address line and you can change the sound setting.
Edge for Windows:
Sound is automatically allowed.
To change this, click the padlock in front of the address line and you can change the sound setting.
Managing Downloads
The * keystroke will save a picture in any Kinderlogo activity. This command is designed for teachers to use and is not listed in the Help (?) information.
The intent is for the file to be quickly saved in the Downloads folder with minimal interaction needed by the teacher. It is likely best if the teacher doesn’t have to navigate to a specific folder during a busy classroom of students using Kinderlogo. In all the browsers, you can specify the folder to save to, if you don’t want to use the default Downloads folder.
You can adjust the download setting to avoid having to navigate to a folder to save to. (Keep in mind that these download settings will apply to all applications on your computer, not just Kinderlogo, so you may wish to consider the implications of changing these settings.)
After making these settings, when you save a Kinderlogo picture, you will need to click OK a couple of times before and after the picture is saved.
Here’s how to change download settings in popular browsers.
Chrome for Windows, Macs, and Chromebooks:
- Start any Kinderlogo activity.
- From the menu at the upper right of the window (the three vertical dots), choose Settings.
- Click ‘Downloads’ at the left.
- Uncheck the box that says ‘Ask where to save each file before downloading’.
On Chromebooks, you may also see a notification appear at the lower right of the screen that shows the download and gives you an opportunity to copy it or see it in the folder. You may wish to disable this notification. To do this, go to Settings and search for Notifications.

Turn on ‘Do not disturb’ to prevent the download notifications. You may or may not want to change this setting, as it affects all notifications on the device.
Safari for Macs:
- Start any Kinderlogo activity.
- Click the word Safari at the upper left of the window.
- Select Preferences.
- Click ‘Websites’ in the horizontal menu.
- Scroll down and select ‘Downloads’ at the left.
- You will see a list of currently open windows. Select ‘Allow’ for both pub.terrapinlogo.com and weblogo.terrapinlogo.com.
- Now click ‘General’ in the horizontal menu.
- At the bottom, set ‘Remove download list items:” to ‘Upon successful download’.
- Uncheck the box to open “safe” files after downloading.
Firefox for Windows and Macs:
- From the menu at the upper right of the window (the three horizontal lines), choose ‘Settings’.
- In the ‘General’ settings, scroll down to ‘Downloads’.
- Uncheck the box that says: ‘Always ask you where to save files.’
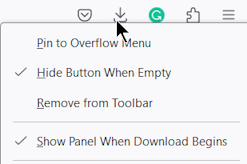
You may find that a Download Panel opens at each download, showing recent downloads and giving you other options. To prevent this from happening, right-click on the Downloads icon in the Firefox menu bar and and uncheck the line “Show Panel When Download Begins”.
Brave for Windows:
- From the menu at the upper right of the window (the three horizontal lines), choose ‘Settings’.
- Scroll down to and select ‘Downloads’ at the left.
- Uncheck both of these boxes:
- ‘Ask where to save each file before downloading.’
- ‘Show downloads when they are done.’
Edge for Windows:
- Click the Edge menu (three horizontal dots) at the right side of the window.
- Choose ‘Settings’.
- Click ‘Downloads’ at the left.
- Uncheck both of these boxes;
- ‘Ask me what to do with each download.’
- ‘Show downloads menu when a download starts.’
Adjusting Key Repeat Settings
Children like to press down and hold the ‘F’ key to move the turtle forward long distances. This is fine. However, sometimes the keyboard settings need to be adjusted to allow for this.
Note that these are operating system settings, not browser settings, and so they will apply to all applications on your computer.
There are two settings to adjust. One is for the delay before the key repeat starts. The other is for the speed of the key repeat. You can experiment with the settings that work best for you and your students.
Here is how to find the Keyboard Key Repeat settings in different operating systems:
Windows 10 and Windows 11:
- In the search box in the task bar, type Keyboard.
- Select ‘Open’ underneath the Keyboard Control Panel icon at the right.
- In the Keyboard Properties window that opens, make settings for Repeat Delay (before the pressed key starts to repeat) and Repeat rate. You can test the settings in the text field below.
Macs:
- Click the Search icon (magnifying glass) at the top of the Finder.
- Type ‘Keyboard’ and select Keyboard, which opens the Keyboard settings window.
- Adjust the settings for ‘Key Repeat’ speed and ‘Delay Until Repeat’.
On a Macintosh using Firefox, you may find that repeating keystrokes opens up a Quick Find box at the lower left of the screen. You can dismiss this box by pressing the Esc key. To learn how to completely disable this function, refer to this article.
Chromebooks:
- Click the Launcher at the lower left of the desktop.
- Find and select ‘Settings’.
- Click ‘Device’ at the left.
- Click ‘Keyboard’ in the center pane.
- Adjust the settings for ‘Repeat key press’ as you wish. There are settings for:
- Turning key repeat on or off (the default is on)
- Delay before repeat
- Repeat rate