Circles, Squares, and Arcs
STAMPOVAL STAMPRECT STAMPRECTC ARC
In this section, you will learn about Logo’s built-in commands to draw ovals, squares, and arcs.
You could create these shapes without using these commands, but they are very convenient to use, as you will see.
STAMPOVAL xradius yradius
(STAMPOVAL xradius yradius TRUE)
(STAMPOVAL xradius yradius TRUE angle)
STAMPOVAL helps you quickly draw a circle or oval.
The first input, xradius, is the distance from the center to the edge, going horizontally.
The second input, yradius, is the distance from the center to the edge, going vertically.
A circle is a special type of oval: one in which the distance from the center to every point around the rim is the same.
To draw a circle, make both inputs — xradius and yradius — the same.
STAMPOVAL 150 150 will draw a circle.
The circles and ovals are drawn with the turtle at the center.
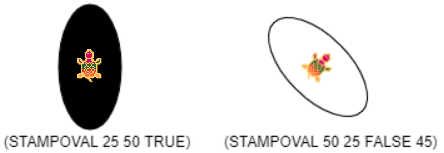
Here are some more examples:

The first oval below is filled because the third input is TRUE. If you use FALSE (or don’t include the third input at all), the shape will not be filled.
Notice that when you use more than two inputs, you must place the entire command inside parentheses.
The second oval is drawn at a 45° angle. The input for the angle comes last.
» Things to Try
Try making circles and ovals of different sizes.
Make some of them filled.
Make some at different angles.
Draw some concentric circles (circles inside other circles).
STAMPRECT width height
(STAMPRECT width height TRUE)
(STAMPOVAL width height TRUE angle)
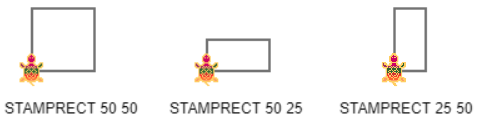
STAMPRECT helps you quickly draw rectangles, which includes squares.
The first input, width, is the distance from the turtle’s position at the lower left corner to the right.
The second input, height, is the distance from the turtle’s position at the lower left to the top.
A square is a special type of rectangle: one in which both the width and the height are the same.
So, to draw a square, make both inputs the same.
STAMPRECT 150 150 will draw a square.
STAMPRECT 100 200 will draw a rectangle.
The shapes are drawn with the turtle at the lower left.
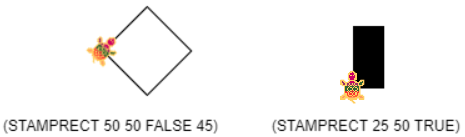
Here are some more examples:
The first rectangle (actually a square) is drawn at a 45° angle. The input for the angle comes last.
The second rectangle below is filled because the third input is TRUE.
Notice that when you use more than two inputs, you must place the entire command inside parentheses.
» Things to Try
Try making squares and rectangles of different sizes.
Make some of them filled.
Make some at different angles.
Draw some concentric squares or rectangles (shapes inside other shapes).
STAMPRECTC width height
(STAMPRECTC width height TRUE)
(STAMPRECTC width height TRUE angle)
STAMPRECTC helps you quickly draw rectangles, which includes squares.
STAMPRECTC is just like STAMPRECT except that the turtle is placed in the center of the rectangle.
The first input, width, is how wide the rectangle is.
The second input, height, is how tall the rectangle.
A square is a special type of rectangle: one in which both the width and the height are the same.
So, to draw a square, make both inputs the same.
STAMPRECTC 150 150 will draw a square.
STAMPRECTC 100 200 will draw a rectangle.
The shapes are drawn with the turtle in the center.
Here are some more examples:
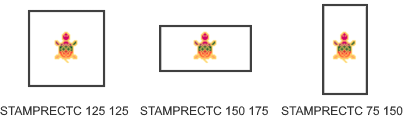
If you add a third input of TRUE, the rectangle is filled. Use FALSE to leave it empty.
Notice that when you use three inputs, you must place the entire command inside parentheses.
You can change the heading of the turtle before giving the command, like this:
RT 45 (STAMPRECTC 50 50 TRUE)

» Things to Try
Try making squares and rectangles of different sizes with the turtle at the center.
Make some of them filled.
Make some at different angles.
ARC degrees radius
(ARC degrees radius TRUE)
Using the ARC command can lead to interesting designs.
ARC draws a portion of a circle. The turtle is at its center. The arc is drawn using a number for degrees and one for radius.
The arc is drawn starting in the direction the turtle is heading and continues clockwise for the number of degrees. The turtle does not move from its location.
The two number inputs are for the number of degrees of the circle the arc will cover, and the radius, which determines the size of the circle.
If you use TRUE as the third input, Logo closes the arc by drawing a line from endpoint to endpoint.
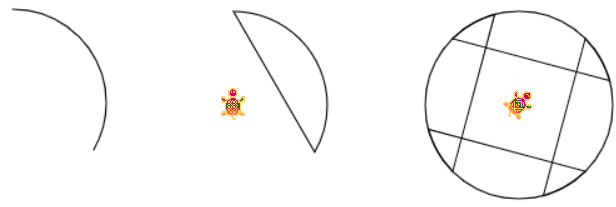
The design at the left uses this instruction: ARC 120 75
The number of degrees, 120, is a third of a circle, as a full circle would be 360°.
The middle design uses this instruction: (ARC 120 75 TRUE)
The third input of TRUE tells the turtle to join the ends of the arc.
The design at the right is created using this set of instructions:
RT 45 REPEAT 4 [(ARC 120 75 TRUE) RT 90]
It uses the second instruction above and repeats it four times.
» Things to Try
What happens if you use a negative number for degrees?
Try other inputs to ARC and you will see how powerful this command is.
Create a design using ARC. Let a friend try to recreate it.
You can try to recreate an ARC design that your friend makes.