Configuring Terrapin Logo
Please note that for Household Licenses, you can only configure the menu and startup Commands!
Terrapin Logo has so many configuration options that we created a separate configuration page. Please navigate to the configuration page with this link. Logo greets you with a login page:

Enter your license code, then click Load. The page changes
considerably, displaying your current settings:

If you been working with student lists before, Terrapin Logo tries to load the information it knows about you; more information below. Otherwise, it loads any configuration information that you have saved previously.
Often, more information about a topic is available via a “Read more…” link.
Important: Click Save to save your settings!
Let us cover the available options:
Menus
Would you like to make Terrapin Logo look less challenging to your students? Feel free to reduce the contents of the menu bar, or the iconbar.
Click the Configure Menu button to display a dialog that lets you
select the menu items and options that are available to users of
Terrapin Logo.

The dialog lets you uncheck any menu item, menu box, and icon bar element. Terrapin Logo only displays checked menu items and buttons.
Startup Commands
Enter any Logo commands that you want Logo to execute automatically once somebody logs in. Most often, you may want to change the layout of Logo panels, or the initial current folder.
If you define a procedure named MAIN, Logo executes that procedure automatically.
We have collected a number of example commands. Click here for these examples.
If you already have used Terrapin storage, and you have created INIT.LGO files, Logo collects these files and displays the content in the edit field.
Note: Logo does not print a welcome message if you have defined any startup commands. If you still would like a welcome message, add a PRINT command to your startup code (please note the use of back-quotes as a string delimiter to preserve the case and the spaces):
PR `Welcome to your Logo class!`
Startup File
For the desktop version, you can enter the full path to a .lgo or
.logoenv file here that Logo should load after the user has logged in.
The Logo code contained in that file will be executed after the startup
code above.
Setting the Initial Folder
This information is relevant to the desktop version only, or if you use a storage like Google Drive or Dropbox in the Web version. The Web version cannot write to any folder except for the browser’s Downloads folder.
Logo’s SETCURDIR command can be used to set the current folder for I/O commands. If you do this in the startup section, the folder that you set will be the student’s initial folder. The command expects a path name as input.
Often, students have their own private folder. In some environments,
this may be a drive letter like, for example, H:. In other
environments, students have a folder with their login name, or students
of a class share a folder.
If you use CSV files for student logins, the login information that the file defines is available to be used as part of the path name that you use as input to SETCURDIR. The following are special names, enclosed in curly brackets, which Logo substitutes with the corresponding piece of the student’s login information.
{USERNAME}the student’s login name{CLASSROOM}the student’s classroom if defined in the CSV{HOME}the home folder (desktop version){DOCUMENTS}the Documents folder (desktop version){DOWNLOADS}the Downloads folder (desktop version)
The following example sets the folder to a local disk drive (denoted by
the start of the path name ~PC/, followed by the drive letter, and a
path name containing the student’s login name. You also need to use
vertical bars around the path name, because the curly brackets makes
Logo think that you want to create a Logo array.
SETCURDIR "|~PC/H/STUDENTS/{USERNAME}|
This is what you can define if you have a Household License. Everything below this point is only available to multi-user licenses.
Campus Name
This is the campus name that we assigned to you when you bought the
multi-user license. Sometimes, this is the name of the person that
ordered the license, like rjones. Feel free to change the campus name
to your liking; it must be unique, however, and it can only contain
lower case letters, numbers, and underline characters.
Students use the campus name to log in to Terrapin Logo.
Vetting
This setting is for the desktop version of Logo only; the executable
must also be configured to read a configuration file logo.conf (see
below).
Sometimes, it may make sense to keep Logo from downloading the latest Logo version. You can enter the latest Logo version that you want to download into this field. The Logo version that you entered does not need to exist; Logo simply ignores any new code with a version number higher than the one you entered.
The Logo version starts with “5.1.”, followed by the two digits of the current year, then a three-digit value that is the day of the year. It ends with a daily build number (which most often is 0).
An example: A Logo version posted on July 1, 2019, would have the version number “5.1.191820”, where “19”stands for 2019, and “182” is the 182th day of 2019. If it would have been necessary to post another version of Logo on that day, the version number would be “5.1.191821”.
Automatic Logout
Enter the number of minutes of inactivity before Logo logs out automatically. This setting can be convenient if students forget to log out after a class. Leave it blank if you do not need this setting.
Login Options
Several login options are available for you to choose from. Please select the one that your students are most confident with.
Campus Name
If you do not have very many students, or if you do not need to distinguish students by classroom or name, you will want to use this option. Students enter the campus name (see above) and a password to log in. Note that student can use this information to log in from home as well.
Automatic Login
This option is available to the desktop version of Logo that has been
configured with a logo.conf file (see below). If selected, Logo does
not display a login dialog at all; it loads Terrapin Logo directly.
When logging in automatically, Logo attempts to pick the student’s system login name (Windows or Mac) as the student name. Logo uses the name to greet the student, and it is available in Logo’s global :USERNAME variable.
Student CSV Files
If you want more fine-grained control over who logs in to Logo, you can upload a CSV file containing student names, passwords, and classroom names.
Any spreadsheet program like Excel, Google Sheets, or Numbers can export data as CSV files. Logo can read these files as long as the separator is a comma, and the delimiter is the double quote. Once you have uploaded a file, click the “View” button to verify the correct upload, and to assign column numbers to column names so Logo knows where to look for student names, passwords, and/or classroom names.
For current users of multi-user licenses, Logo checks if there are any student lists that it knows, and collects these. Click “View” to view the collected student information. You could, for example, download that list, modify it with a spreadsheet progam, and upload it again.
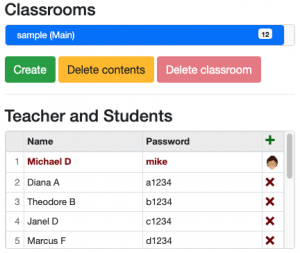
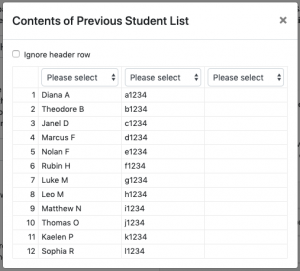
Here is an example of a student list as you may have created it in the Classrooms dialog, and how the new configuration page would display that list. Note that the teacher’s entry is not transferred.
Note that the file is uploaded to the Terrapin server once you click the “Save” button.
Logo uses the information as follows:
- If you enter a name without a password, the student uses that name as the password.
- If you use both name and password, the student uses the password.
This means that a name or a password needs to be unique across the entire list.
If you use classroom names to group students together, names and/or password only need to be unique in a classroom. Students would use a combination of the campus name, a dot, and the classroom name to log in. Note that classroom names are not case sensitive, and may only contain lowercase letters, digits, and the underline character.
Example:
- Your campus name is “abchigh”.
- The student’s classroom name is “grade8”.
Then, the student’s login classroom would be “abchigh.grade8”.
logo.conf
The desktop version can load a file logo.conf from the Logo
executable’s resources folder. This file contains configuration
information for the desktop version. It resides in the resources/Logo
subfolder of the Terrapin Logo installation:
Windows: C:\Program Files\Terrapin\Terrapin Logo\resources\Logo
Mac: /Applications/TerrapinLogo.app/Contents/Resources/Logo
Currently, there is only one entry campus=campus name. This name must
match the campus name that you entered on the configuration page (see
above). We use this information to verify your license, to implement
automatic logins, and to provide vetting information.
An administrator can deploy Terrapin Logo to multiple computers with this file set up correctly.