Teaching Logo Something New
 Wouldn’t it be great if you could just type
 SQUARE
instead of REPEAT 4 [FD 100 RT 90]? Go ahead and try it but expect an
error message because Logo doesn’t know what SQUARE means. Yet. With
your help as the teacher, Logo can learn new commands! Then, you can
use them just like the built-in commands to save time, typing, and typos.
To teach Logo how to square, type TO SQUARE and you’ll see the
workspace editor — think of it as your chalkboard where you’ll write
today’s lesson. May I have your attention, please? Read
carefully.
Between the lines TO SQUARE and END, type the instructions to make a square, just like you did in the
Listener panel. Go ahead and type REPEAT 4 [FD 100 RT 90] and then press
Enter. Oops! You entered an empty line.
Instructions you type in between TO and END are remembered for later;
they are not run immediately, as they are in the Input panel.
Before we proceed, let’s have a quick look at the buttons at the bottom of the Editor panel.
- The red Erase button lets you erase the contents of the Editor panel. Confirm this action by clicking Yes in the dialog that pops up.
- The gray Save button lets you save the contents of the Editor panel. In the Web version of Logo, the file is saved to the Downloads folder on your computer. In the Desktop version of Logo, you can navigate to a folder to save the contents of the Editor. The asterisk after the word Editor at the top of the panel indicates that the file has not been changed or has changed since the the last time it was saved.
- The blue Run button defines the contents of the Editor panel.
Note that there are shortcut keystrokes for Save and Run.
Click the Run button. This loads the editor contents into the Logo workspace, and you’ve just taught your first lesson! You deserve a raise!
Now, type SQUARE.
More Teaching Fun
 A square is four lines and four turns. But,
what is four
A square is four lines and four turns. But,
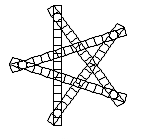
what is four SQUARE commands and four turns? Type REPEAT 10 [SQUARE RT 36]
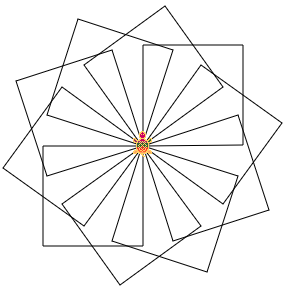
and see what a star of squares looks like. Change the numbers for
REPEAT and RIGHT
to see what other interesting things you get. How about a pinwheel? How
many squares are in that?
Of course, all of your squares are 100 turtle steps on a side because that’s how you defined
it. How can you change it? If you type TO SQUARE again, you will see
the procedure on the chalkboard just as you left it. You could change
the FD 100 to FD 50, but then, what if you wanted bigger squares
again later? You’d have to change it back to 100 again. This would get
old in a hurry. Just remember, you’re a teacher!
Why not teach Logo how to make a smaller square? Call it BOX. Just type
TO BOX, press Enter, type REPEAT 4 [FD 50 RT 90], click on the
Run button and there you have it! Now you can draw a big square with
SQUARE and a small square with BOX.
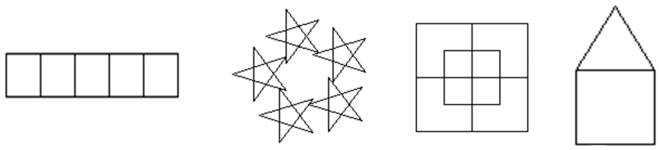
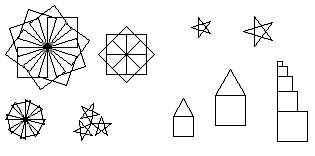
Try defining a procedure to draw a triangle — it’s just three lines and three turns. What about a star? Once you have your new commands defined, see what you can make. Here are some suggestions.
Your Input Matters
If you want to draw squares of a zillion different
sizes, do you need to define a zillion different procedures with a
zillion different names? That would be silly. The only difference
between SQUARE and BOX is the number after the FD command. But how
can you replace that number with any number you want, any time you want,
without changing it over and over again in the “Define a Procedure”
window? The answer is simple – use an input to your SQUARE procedure
so you can just type SQUARE 100 or SQUARE 50 or use any number as
the actual input.
What’s an actual input?
An actual input is the input you give to a command or
procedure when you actually run it, like the number 100 in FD 100.
An actual input is also called an actual parameter or actual
argument. What other input is there?
A formal input is used in the definition of a procedure. It is a special container with a name chosen by you. A formal input is also called a formal parameter or formal argument. It is also called a variable because its contents can change or vary.
You will find that just the word input is often used for both types of input. Don’t let that confuse you. It’s just easier to say input.
 Type
Type TO SQUARE
to bring up the workspace editor again. Click right behind the word
“SQUARE”, and enter the name of the input. Since we are going to draw
squares of any size we want, let’s use the name SIZE for our input to
SQUARE. Type :SIZE and then click into line 2. Replace the 100 input
to FD with :SIZE. When you run SQUARE later on, :SIZE will be
automatically replaced with the actual input you give to SQUARE. Click
the Run button to save your new SQUARE.
Now, you can draw squares of any size you want with just the SQUARE command
in the same way you draw lines of any length with the FD command. Just
give SQUARE an input. An actual input, that is. Add an input to other
procedures in the same way. It’s simple, now.
SQUARE 70, SQUARE 120, SQUARE 4. Try it out!
Need More Input?
Your procedures can have more than one input, just like the
REPEAT command. Suppose you want to draw a
stack of boxes. How would you do that? Of course, you would use the
SQUARE procedure to draw the box. But then what? How about moving the
turtle to the top of the box it just drew? Then, it would be ready to
draw the next box. Now how many boxes do you want in your stack? How
about a short stack of 3 big boxes? Try REPEAT 3 [SQUARE 40 FD 40].
 If you change the 3 to 7, you get a tall stack. If
you change the 40s to 12s, you get smaller boxes. You can make stacks
of boxes with one procedure called
If you change the 3 to 7, you get a tall stack. If
you change the 40s to 12s, you get smaller boxes. You can make stacks
of boxes with one procedure called STACK and give it two inputs: one
for how many boxes and another for how big to make them. Let’s name them
HOWMANY and HOWBIG.
Type TO STACK to bring up the chalkboard and add the names of the two inputs after the word “STACK”.
Then type in the instruction to draw a stack of any number of boxes of any size.
- Where will you put
HOWMANY? - Where will you put
HOWBIG? - How about a star made from stacks?
REPEAT 5 [STACK 15 7 RT 144]