Part One
First Things First!
Welcome to Terrapin Logo. I know you’re anxious to get started but there are a few things we should go over first to make sure everything goes smoothly.
If you have installed other software products on your computer before, you can skip these first few pages and go right on to “Folders and Files” to make sure everything is where it should be. Don’t worry. The rest of us will catch up in just a few minutes. The first thing to check out is whether or not your computer system is capable of running Terrapin Logo. Chances are that it’s fine, but here is what’s needed at a minimum:
For Windows:
Windows XP or newer
25 MB free disk
space
For Macintosh:
OS X 10.6 or higher
30 MB free disk
space
Now that we have the right tool for the right job (or, that we’ve satisfied the minimum system requirements), we should have no trouble installing Terrapin Logo. So, let’s do it!
Installation
Installing software is really just getting it copied to your system’s hard drive in the proper place and format so that you can find it and your system can run it.
It is always best to exit from any programs you currently have running before you begin installing any new software. This will make sure that the installation program has enough memory and other system resources to do its job properly.
You will have downloaded the installer image from the Terrapin Logo website at http://www.terrapinlogo.com/downloads/.
Macintosh OS X
 The downloaded image will have a name like
e.g. Terrapin Logo 4.0.dmg. Double-click this file to mount it as a
drive. Double-click that drive again to open its root folder.
The downloaded image will have a name like
e.g. Terrapin Logo 4.0.dmg. Double-click this file to mount it as a
drive. Double-click that drive again to open its root folder.
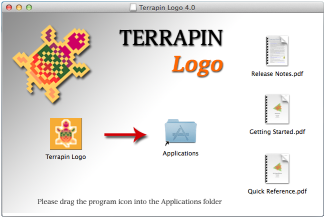
The folder contains several icons. Drag the Terrapin Logo
icon to the Applications Folder icon; if nothing happens, drag the
Terrapin Logo icon into the Applications folder on our Mac. This is all;
now, Terrapin Logo is installed.
The first time you
double-click the Terrapin Logo icon, your Mac will ask you if it is OK
to run the program because it has been downloaded from the Internet.
Trust us; it is OK.
Windows
The downloaded Windows installer image is a file like e.g. Terrapin
Logo 4.0.exe. Double-click this file to start the setup program.
The setup program will display a series of dialog boxes that require a response from you. The simplest thing to do is just click on the responses that will continue the installation process (Next, I Agree, OK). This will install Terrapin Logo in the Program Files folder of your C drive and add an entry for Terrapin Logo in the Programs submenu of the Start button.
The License File
Without a license file, Terrapin Logo will run just fine; you can, however, neither save your work, nor send your work to the printer.
To unlock your copy of Terrapin Logo, you need to buy a license file.
This is a file whose name ends with .license. If you have such a file,
double-click the file to install it, after you have installed Terrapin
Logo. On the Mac, you may again see a dialog if you agree to run the
program because it has been downloaded from the Internet. Click OK to
continue. If all goes well, you will see a dialog telling you that all
features of Terrapin Logo have been unlocked.
Folders and Files
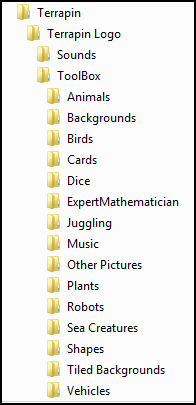 The installation process created a whole lot of
folders on your computer. As you can see from the illustration, there
are folders within folders within folders. It may seem a little messy at
first but there is method to all this madness - organization! You’ll
find this to be a big help when you need to find a noise to make (in
Sounds) or a view of the earth from the moon (in Backgrounds).
The installation process created a whole lot of
folders on your computer. As you can see from the illustration, there
are folders within folders within folders. It may seem a little messy at
first but there is method to all this madness - organization! You’ll
find this to be a big help when you need to find a noise to make (in
Sounds) or a view of the earth from the moon (in Backgrounds).
It’s also important to know where to put things because items
in one folder are treated differently than items in another folder. For
example, the files in Backgrounds are used to fill the graphics screen
while the files in Shapes are used to change the shape of the
turtle.
Suppose you have a collection of images of
your favorite cartoon characters. Where should you put them? They really
don’t seem to fit anywhere. Well, I think you’re going like this: you
can create your own folder within the Toolbox and put your stuff in
there! This may not seem very important right now but you’ll see what I
mean later on.
Feel free to browse through the
folders to see what files are there. Just don’t delete anything! Some
folders have a lot of files; some have just a few. As time goes on,
you’ll probably add some files of your own. Try to keep things organized
like it is now; it will be a big help later on.
Starting Terrapin Logo
![]() Go ahead! On the Macintosh, double-click the
Terrapin Logo program icon. On the PC, click Start, Programs, Terrapin
Software, Terrapin Logo and then Terrapin Logo, or double-click the
Terrapin Logo icon on the desktop. The very first time you start, there
will be a little delay while some work files are being built; next time
it will start up faster. And here we are - ready to explore the Logo
environment.
Go ahead! On the Macintosh, double-click the
Terrapin Logo program icon. On the PC, click Start, Programs, Terrapin
Software, Terrapin Logo and then Terrapin Logo, or double-click the
Terrapin Logo icon on the desktop. The very first time you start, there
will be a little delay while some work files are being built; next time
it will start up faster. And here we are - ready to explore the Logo
environment.
![]()
If you did not install a license file, Terrapin Logo will inform you that it cannot save or print; click OK.
Take a Look Around
There’s a lot to get to know but don’t worry - you don’t have to know it all at once. We’ll just go over a few of the important things first. So, take a few minutes and look around.

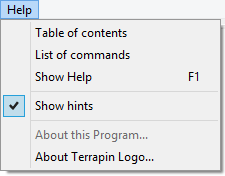
Move the mouse pointer (but don’t click yet) to each of the buttons just above the Graphics window. This is called the Tool bar. You should see a message pop up telling you what each button is for. If you don’t see the messages, then click on Help and select Show hints. If you want to turn them off later, just select Show hints again.
The way the screen looks this time is called ‘Standard Window Layout.’ The large Graphics window is where the turtle moves around and draws. It’s also where you put background images, other pictures, buttons, sliders and other controls for your projects.
The Listener window is where you type commands or instructions for Logo to do. Often the results will affect the Graphics window but sometimes you’ll see a response in the Listener.
Entering Instructions
Canyoutellwhatthissays? Can you tell what this says? Putting a space between the words of a sentence makes a big difference. The same is true for Logo. When you enter instructions into the Listener window, make sure you put a space between the words. Press the Enter key to tell Logo to run the instruction.
Make sure the Listener window is the currently active window (the one with the highlighted title bar). To make the Listener window current, just click in it with the mouse, but watch where the vertical insertion bar (or cursor) appears because that’s where your typing will be entered.
 The illustration shows some examples that you
should try yourself. The instructions are shown in lowercase here but
that’s not necessary. You can use capital letters if you want; that’s
what Logo uses for output but it’s not fussy about your input. Watch
carefully as you type the letters and you will see how the colors
change. This is called syntax highlighting and it’s much more that just
colorful. It can help you avoid errors. If you want to turn it off, it’s
in Text Colors under the Preferences menu. You may find you like it if
you work with it a while.
The illustration shows some examples that you
should try yourself. The instructions are shown in lowercase here but
that’s not necessary. You can use capital letters if you want; that’s
what Logo uses for output but it’s not fussy about your input. Watch
carefully as you type the letters and you will see how the colors
change. This is called syntax highlighting and it’s much more that just
colorful. It can help you avoid errors. If you want to turn it off, it’s
in Text Colors under the Preferences menu. You may find you like it if
you work with it a while.
Many of the Logo commands
have an abbreviation that means the same thing. The PR in the second
example is short for PRINT. This saves typing time but you’ll always
know what PRINT means.
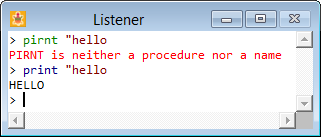
To Err is Human
 Everybody makes mistakes. It’s going to
happen. Even with the syntax highlighting and trying to be very careful,
you’re going to press Enter before you see that typo. Don’t worry about
it. Logo will quietly let you know there is a problem and then you can
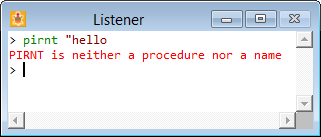
fix it easily. The example should say
Everybody makes mistakes. It’s going to
happen. Even with the syntax highlighting and trying to be very careful,
you’re going to press Enter before you see that typo. Don’t worry about
it. Logo will quietly let you know there is a problem and then you can
fix it easily. The example should say print instead of pirnt. Since
Logo didn’t understand this nonsense, it displayed a message to let me
know that PIRNT was the problem. I don’t have to type the whole line
again.
 There are a few ways I can correct this
mistake. I can move the insertion bar with either the mouse or the arrow
keys. Since I’m already typing, I find it easier to use the arrow keys.
Getting rid of unwanted characters depends on where the insertion bar is
placed. If it’s in front of the characters, then use the Delete key; if
it’s after the characters, then use the Backspace key. Once
There are a few ways I can correct this
mistake. I can move the insertion bar with either the mouse or the arrow
keys. Since I’m already typing, I find it easier to use the arrow keys.
Getting rid of unwanted characters depends on where the insertion bar is
placed. If it’s in front of the characters, then use the Delete key; if
it’s after the characters, then use the Backspace key. Once print is
spelled correctly, all I have to do is press the Enter key to make Logo
run the instruction again.