Logo Blocks Tutorial — Intermediate Mode
View and download a PDF of this tutorial.
Try some Logo Blocks activities.
If you haven’t use Logo Blocks before, start with the Beginner Mode tutorial.
That will get you started quickly. Then return here to learn more block commands.
When Logo Blocks first starts up, you see the Beginner set of blocks. Click the word Intermediate to get to more commands. You can click on any of the words in the list at the left to get to the blocks in that group.
In Intermediate Mode, blocks are organized into eight categories to help you find them.
 Moves: move and turn the turtle, set the speed, set the screen mode
Turtles: set the turtle shape and size, hide or show the turtle, use many turtles
Draw: set colors and pen size, pen up or down, draw shapes, fill, erase
Sound: say words or sounds
Flow: use commands that control what happens (IF…THEN and more)
Math: use random numbers and math operations
Output: print text in a dialog
Procedures: write simple procedures with or without an input
How to Use Blocks
- Click a category name at the left.
- To use a block, drag it to the workspace, the large white area to the right of the blocks.
- If you see a small down arrow after a command, it means there are more choices. Click the down arrow to see them and make a selection.
- You can change the number in any text field.
- If a border around the number is a light purple color, you can replace that value with any block that produces a number. For example, if you want to turn right a random amount, you can replace the 90 in the turn block with the random number block (in the Math section). You can change the values in the number fields to set the range you want.


Let’s learn some more block commands!
Moves
These blocks let you control how the turtle moves and turns.
 Use this block to move the turtle forward or back. You can change the number in the text field. With this one block you can move the turtle forward or back any amount. You can even use a negative number.
(FYI: forward -100 is the same as back 100)
This block for turns works like the forward block. Use it to turn the turtle left or right. You can change the number for how much the turtle should turn.
 Home is where the turtle starts out. Add this block whenever you want to the turtle to return to the center of the Graphics panel.
 The turtle knows about x- and y-coordinates. The turtle’s Home is in the center of the Graphics panel, where x=0 and y=0. Use this block with positive and negative numbers to place the turtle anywhere on the screen.
 Use the speed block to set how fast the turtle moves. In Beginner mode, the turtle speed is set to .8. Here you can click the arrow after Full to choose the speed you want. If the turtle moves more slowly than you want, click the red Stop button at the bottom of the Logo Code area!
 You can tell the turtle what to do when it reaches the edge of the Graphics panel. It can wrap around to the other side, bounce off the edge, stop when it reaches an edge, or just keep moving out of sight. Try this block code and change the setting to see what happens! The text in the Logo Code area tells you the Logo command being used. Click the Graphic window’s yellow reset button to clear the drawing between tests.

Turtles
These blocks let you control the appearance of the turtle and set up several turtles.
 You can set the size of the turtle. Size 1 is the standard size. You can set the size to any number from -99 to 99. If you set the size to 0, you won’t be able to see the turtle! If you use a negative number, the turtle flips to head in the opposite direction. You can also use a decimal for the value. Using .5 sets the turtle shape to half its normal size.

You can change the shape of the turtle. It can look like a robot or any of a number of animals.
 Add this block to restore the turtle to its original shape, size, speed, and color.
 Use these blocks to show or hide the turtle. For example, you may want to hide the turtle so you can take a screenshot of your picture without the turtle. Maybe you can create a game with a hidden turtle!
 This command lets you arrange many turtles (1–50) facing out around a circle. Use it, for example, like this:
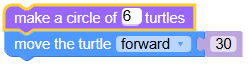
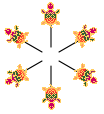
 This block puts 10 turtles, spaced 15 steps apart from each other. (You can use any number of turtles from 1 to 50.)

If you want to use a different turtle shape, you will likely need to change the distance apart. Be sure to make the line of turtles before you set the shape.


When you have either a circle or line of turtles, they all move and turn in the same way. In the full version of the Terrapin Logo programming language, you can set multiple turtles to move and turn independently.
 Use this block to return to just one turtle after using multiple turtles.
Draw
These blocks are all about drawing: adding color and shapes, and more.
![]() Use this block to erase all the graphics. Put it first in your code to make sure the screen is clear.
Use this block to erase all the graphics. Put it first in your code to make sure the screen is clear.

Use this block to set the color of the turtle’s pen. You can click on any color. The turtle, whatever shape it is wearing, also changes to that color.
 Replace the red pen color block with the random color block and let Logo Blocks choose the color.
 Use the pen block to control how the turtle draws:
- down lowers the pen so the turtle can draw
- up raises the pen so the turtle moves without drawing
- erase removes lines the turtle (some thin lines may not be completely erased; set the pen width to more than one for best results)
- reverse inverts the colors, which can give you some interesting results!
 Use the pen width block to change the size of the pen the turtle uses. You can use any number from 1 to 999.

The background block lets you set the background to any of 15 different images.
You can drag the slider between the workspace and Graphics areas to see more of the image.
 If you want a plain background in a solid color, use the set background color block. You can choose from among the 137 available colors. Note that if the pen color is the same as the background color, you won’t see lines that the turtle draws, even when the pen its down.
 The next two blocks let you print text to the Graphics panel. This is called TurtleText (TT). You can set the font and size, and then enter the text for the turtle to print. The text will appear in the current pen color. Don’t forget to pick up the turtle’s pen if you don’t want it to draw a line between different sets of text!

These blocks give you a quick way to draw rectangles and circles. You can make them any size and choose to draw the outline of the shape or a filled shape. A rectangle that has the same width and height is a square. An oval that has the same width and height is a circle.
The shapes are drawn with the turtle in the center and use the turtle’s heading.
 You can fill an area of any shape with color using the fill block. Note that the pen must be down for fill to work. It is best to pick up the turtle’s pen, move it inside the shape, then put the pen down before using fill. To avoid potential “leaks” that cause the entire background to fill, set the pen width to 2. You could use the fill block to change the background color before you draw anything.
Sound
You can speak words and play sounds using the blocks in the Sound section.
 After dragging the say block to the workspace, type the words you want spoken in the text box. The computer will choose a voice to use.

There are 49 sounds to choose from in the play sound block. You’ll have fun exploring those!
Flow
The Flow commands allow you to control when things happen in your program.
 IF/THEN and IF/THEN/ELSE are commonly used in coding to make decisions, also known as branching.
If a condition is True, then do something; otherwise do something else. You may not need the ELSE part.
In Intermediate mode, you can use numbers (in the Math section) and the Print command (in the Output section) to explore decision making.

Here is an example that uses simple math. You might find it fun to choose a sound to indicate the result!
This next program is for a number game. The computer picks a number from 1 to 10 and when you run the code, it tells you if the random number it picked is the right one.

Here is the Logo code that is generated:

In the Advanced mode tutorial, you’ll see how to expand that game by asking the user to enter a guess.
 The compare block gives you the result of comparing numbers.
Use the number block in the Math section.
 In Advanced mode, you can also compare letters and words. The checkbox called “caseless” doesn’t apply to numbers, only to letters. When this box is checked,
 B and b are considered equal, even though B is uppercase and b is lowercase. That is what “caseless” refers to. It doesn’t pay attention to the case of letters when the box is checked.
Note that if you don’t have an ELSE condition, nothing will happen if what you are comparing is FALSE. You can see this if you use these numbers.

In this next program, no message is displayed.

Using IF/THEN/ELSE allows you to cover both cases.

 The repeat block is also in Beginner mode. Change the number 10 to the number of loops you want, and put your command or sequence of commands inside the repeat block.
Can you figure out what this will draw? Try it and see!

 The forever block does exactly what it says. It will continue to run your code until you click the red Stop button (at the bottom of the Logo Code panel).
Unlike repeat, where you tell the computer how many times to run the commands, forever just keeps going!
The forever block does exactly what it says. It will continue to run your code until you click the red Stop button (at the bottom of the Logo Code panel).
Unlike repeat, where you tell the computer how many times to run the commands, forever just keeps going!
You might want to change the speed of the turtle to go more slowly, as the screen could fill up with lines very quickly, depending on what you tell it to do!
Try this fun program:

 Another way to control how your program runs is to use the wait block. It adds a pause to your program in milliseconds. A millisecond is a thousandth of a second. So, 1000 milliseconds equals one second.
Try this code:


You can use the end program block to stop a program. You will use this block when you write procedures.
Math
With these blocks, you can work with numbers in many different ways.
 Use this block when you want to insert a number into a block. You can enter the number you want. You saw this block used in the examples for Flow.
 Use the operations block when you want to do math. Connect a number block (see above) in both spots. You can then add, subtract, multiply, or divide them, find the remainder, or use an exponent. Three to the second power, or three squared, is an example of an exponent, written like this: 32. It means 3 x 3 or 9.
 This operation reports 2. Can you figure out why?

Remainder tells you how many are left over when you divide the first number by the second number. In this case, 20/3 = 6 with a remainder of 2.
(6 x 3 = 18, and 20–18 = 2)
What do you think will be the result if you change the 20 to 18?
You can use the result of any operation as an input to a forward or turn block, like this:

 You’ve already seen examples of using the random block. Anytime you need a number, just replace the current value with this block. Enter numbers for the range you want and see what happens!
Output
The Output section gives you a block that presents information. Output is the opposite of input, where you give the computer information. Now, you are telling it what to output.
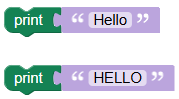
 The print block can accept either numbers or words. The text is displayed in what Logo calls an alert box.
Logo coding info:
If you type uppercase and lowercase letters in the print block, the text is kept that way. Logo treats it as a string.
If the text is all capital letters, Logo treats it as a word.
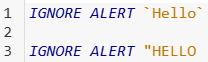
You can see the difference in the Logo Code area.
The backquotes keep the text as you entered it.
The quote mark (“) keeps the word in all uppercase.
You don’t have to worry about this. It just how Logo works! If you go on to use the full Logo language, this will be useful information to remember.
Procedures
A procedure is a set of code that has a name. You can reuse the code by calling it by its name. It is very efficient to create procedures, as you will see!
Logo Blocks lets you create procedures that have no inputs or the number of inputs you want.
Here are some examples of how to create and use procedures, with and without inputs.
 Let’s create a simple procedure to draw a square. Drag this MYPROC block to the workspace area.
Change MYPROC to SQUARE so that it has a meaningful name. Keep the number of inputs at 0.
Add blocks to draw a square. You can use the repeat block, along with forward and turn blocks. Your procedure might look like this:

If you click Run, nothing happens. Your procedure is now defined, but you haven’t told Logo Blocks to use it.
If you look at the Procedures section, you see a new block:
Using this block tells the computer to run your SQUARE procedure.
Your blocks, Logo Code panel, and Graphics panel look like this:

Congratulations! You have just created your first procedure!
How can you use your procedure? Just use its name, SQUARE, whenever you want a square. Try this, for example:

What if you want to have a procedure that will draw any size square you want? To do that, you need to use a variable. A variable is a placeholder. You give it a name, like SIZE.
Start with the MYPROC procedure and edit it to look like this:

Now we need to tell it to use the variable. In the Procedures section is a block for an input.

Drag that block to replace the 100 in the forward block. It now looks like this:
Logo Blocks even knew to call it SIZE!

Now, to use this new procedure that has a variable, you need to call the procedure with a number. In the Procedures area is a different block that is just what you need!

Go to the Math section and grab the number block. Drag it next to the variable name SIZE.
Change the number to the size you want. For example, try 200.

Now click Run. You will see a size 200 square. Also look at the text in the Logo Code area to see how Logo created the code for the procedure. It puts “dots,” or a colon, before a variable name.

Try calling the MYSQUARE procedure with different input numbers.
This design was created using inputs of 10, 20, 30, 40, etc., all the way to 200!

In the Advanced Tutorial, you will see how to automate this process.
Explore these new concepts, create more procedures and, when you are ready, we’ll try even more commands in the Advanced mode!