Making Music
If you have an iOS device like an iPhone or an iPad, this section is not for you. iOS devices have problems with playing music or sounds, and the PLAY command simply does nothing.
 Logo helps you to create amazing music! It comes
with its own tiny music language that lets you create songs using notes
and instruments. The Logo music system is closely modeled after the MIDI
specification, which is the standard for electronic music devices to
exchange music data. This way, Logo will one day be able to connect to
electronic instruments such as keyboards and synthesizers once browsers
support the connection to these devices.
Logo helps you to create amazing music! It comes
with its own tiny music language that lets you create songs using notes
and instruments. The Logo music system is closely modeled after the MIDI
specification, which is the standard for electronic music devices to
exchange music data. This way, Logo will one day be able to connect to
electronic instruments such as keyboards and synthesizers once browsers
support the connection to these devices.
The PLAY command is Logo’s musical centerpiece. Usually, you use the command to play MP3 files and other sound or music files. But you can feed PLAY a list of music commands, and Logo will play these notes on its own, built-in synthesizer.
Sometimes, a box pops up asking you to touch or click the screen before the music begins. Newer Web standards dictate that playback needs to be the result of a user gesture. Also, the Safari browser on Mac computers, iPhones and iPads ignores stereo panning or vibrato commands for the Web synthesizers. See the Special Effects section below for more info.
Some MIDI Stuff
The MIDI standard was defined back in 1996, and it specifies the data format for music data. This data can be transmitted from, say, a keyboard to a synthesizer, stored as a .MID file, and played back from that file. MIDI defines 16 channels, where each channel can play a single instrument, giving a maximum of 15 instruments playing at the same time.
Wait! 15? not 16? This is not a typo. Channel #10 is a special channel. The MIDI people soon discovered that they could not fit more than 128 instruments into their scheme of things, which would have left out all percussion instruments. Therefore, they assigned channel #10 to be the percussion channel, and the percussion instruments to be notes being played in channel #10.
Logo comes with its own built-in synthesizer that can play all of these channels. Internally, Logo translates the music commands that you will learn about to MIDI commands. This way, you can save your songs as .MID files and replay them with any software than can play .MID files. In the future, Logo will be able to listen to MIDI keyboards, or to drive a real synthesizer connected to your computer.
OK, let’s get started.
Notes and Chords
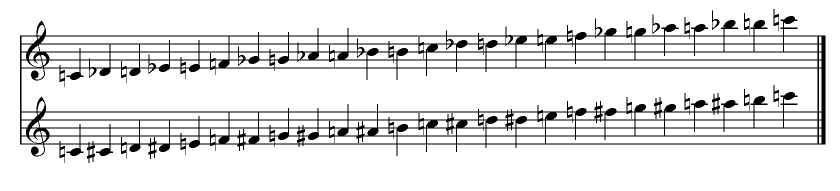
You certainly know the standard note names C, D, E, F, G, A and B? European musicians also know that the letter H is the same as the letter B, so Logo knows that letter as well. Logo also knows sharp and flat notes as in the table above. Simply append the letter “b” or the hash “#” to your note to play the flat or sharp variant. If you look more closely at the table above, you will notice that the note “C#” is the same as the note “Db” or “DB” (remember that Logo usually converts everything into upper case).
Playing a simple melody is as easy as feeding PLAY with a list of notes:
PLAY [G E C E G C]
Want to play chords? Simply use a list instead of a single note. Replace the C with a C major chord. (For now, please keep in mind that lists are used for more than chords):
PLAY [G E [C E G] E G [C E G]]
Octaves
Using the letters only will only give you a single octave, but Logo can play full seven octaves. The official way to support octaves is to append the octave number (a value between 0 and 6) to your note. If you do not append an octave number, Logo assumes that you want octave #4, which is the octave around the note A at 440 Hertz.
Try to add the octave #5 to the last C note, moving it up an octave:
PLAY [G E C E G C5]
If you often move between octaves, Logo knows the Octave command (the letter O). Here, you can set which octave Logo should assume as the default. It is preset to “O4”. Try this:
PLAY [G E C E G O5 C]
The difference between setting the octave and appending the octave number is that Logo remembers the octave for the next PLAY command. Try to play these notes again, and you will see that Logo now plays all notes in octave 5.
This has a very good reason. Often, you will want to split up your notes into multiple PLAY commands, and it is convenient if Logo carries over your general settings to the next command instead of you having to enter all settings again before playing the next list of notes.
You can use the Reset (R) command to reset all values to the default ones:
PLAY [R G E C E G O5 C]
You can imagine that if you put together a song, it is a good idea to start a song with the “R” command.
Also, Logo knows the commands “O#” (one octave up) and “Ob” (one octave down).
Timing
Right now, all notes are equally long. By default, Logo assumes a tempo of 120 beats per minute (BPM). This is equivalent to 120 quarter notes per minute, or two quarter notes per second.
Tempo
You can change the tempo of a song at any time with the Tempo (T) command, followed by the number of beats per minute. Try this to play the first three notes at double speed:
PLAY [R T240 G E C T120 E G C5]
Note Lengths
Most often, you do not want to change the tempo of the entire song, but rather the length of a single note. Logo lets you prepend a note with its length. After a reset, all notes are quarter notes, so the note “C” is the same as “4C” (a quarter note C). The Length (L) command lets you change the default length of a note to anything else. The last example played the first two notes as eighth notes (a quarter note played twice as fast is an eighth note). You can do the same with these two commands:
PLAY [R 8G 8E C E G C5]
PLAY [R L8 G E L4 C E G C5]
The latter changes the length of all notes, and also carries over to the next PLAY command.
You can even fine-tune the note length. The length “8C” is “1/8 C”;
unfortunately, the slash “/” means the Division sign to Logo, so if you
write [1/8C], Logo understands [1 / 8C], which is something entirely
different. Therefore the Logo music language uses the apostrophe instead
of the slash character as in “1’8C”. You can omit the “1’” part usually,
because if you use just a number as a length value, Logo assumes that
you want 1/number.
But you can, of course, use lengths like “3’8” or “5’2”. Let us try this now:
PLAY [R 8G 8E C E G O5 C]
Or, even more pronounced:
PLAY [R 3'16G 16E C E G O5 C]
One more thing. You may know that it is possible to extend a note by half of its length by appending a dot. Well, Logo also knows this, so you can also extend the first note (which is an eighth note) by half of its value, resulting in a 3/16 note:
PLAY [R 8G. 16E C E G O5 C]
Logo treats words that begin with a number, followed by “E”, and end with a number, as numbers in scientific notation! Logo reads the value “2E5” as 2 * 105 = 200000. If you run into this problem, you will see an error message like “200000: unknown note or command name”. You can fix the problem by using the full length notation as in “1’2E5”.
The Pause
A pause is an important part of music. The Pause (P) command acts just like a note, but it is silent. So if you want a pause of 1/2 note, you would use “2P” as the command.
Loops
Although the MIDI standard does not know loops, Logo supports them. Loops cause a bunch of notes to be played over and over again, saving you tons of typing. The number behind the “RPT” command tells Logo how often to repeat the loop. Most often, you will want to use a list to write a loop. In that case, the “RPT” command must be the first element of that list.
Here is an example:
PLAY [R [RPT4 C C5]]
If you omit the repeat count, using “RPT” alone, Logo will repeat the loop until the song ends. This is especially convenient when you write a song with an entire band. You may want to repeat a drum loop until the solo guitar ends. See the “Purple Haze” example below for such a loop.
But beware! If you define nothing but endless loops, you will hear nothing at all! If you do not have a melody, Logo has no way of knowing how long the song is, so it does not loop at all.
Instruments
The standard MIDI instrument assignments are based on the MIDI Manufacturers Association (MMA) General MIDI Mode specification. There are 128 different instruments plus a set of percussion instruments. The Instrument (I) command lets you select an instrument. You are not required to stay with a piano!
Try, for example, instrument #14 (Tubular Bells). It is a lot of fun to try out all kinds of instruments!
PLAY [R I14 8G. 16E C E G O5 C]
Instrument Quality
Logo offers a number of different synthesizers, which you can select by
setting the global variable MIDI.OUTPUT. The global variable
MIDI.OUTPUTS outputs a list of synthesizers. Currently, Logo has these
synthesizers:
SIMPLE: An oscillator-based synthesizer that does a decent job at simulating instruments, but do not expect naturally sounding instruments.
WEB: This synthesizer downloads real instrument sounds from the Web. Therefore, you may see a short delay before a song begins to play.
WEBHQ: This is the same as the WEB synthesizer; the downloaded sound bits have a better quality, but they are bigger, and may be slower to download.
On startup, Logo sets the synthesizer to WEB for mobile devices and WEBHQ for desktop computers, and pre-downloads the Acoustic Grand Piano sound for good measure.
The Safari browser on Mac computers, iPhones and iPads ignores stereo panning or vibrato commands for the Web synthesizers. If you need these (and other effects, like bending), you will have to use the SIMPLE synthesizer.
Please note that not all instruments can play every note. The Grand Piano’s lowest note, for example, is A in octave 1. If you try to play a lower note like e.g. C in octave 0, you will not hear anything.
:MIDI.OUTPUTS Result: [SIMPLE WEB WEBHQ] :MIDI.OUTPUT Result: WEB
And here is the table of instruments:
MIDI Instrument Numbers
Piano, Chromatic Percussion, Organ
| 0 Acoustic grand piano | 6 Harpsichord | 12 Marimba | 18 Rock organ |
| 1 Bright acoustic piano | 7 Clavinet | 13 Xylophone | 19 Church organ |
| 2 Electric grand piano | 8 Celesta | 14 Tubular bells | 20 Reed organ |
| 3 Honky-tonk piano | 9 Glockenspiel | 15 Dulcimer | 21 Accordion |
| 4 Rhodes piano | 10 Music box | 16 Hammond organ | 22 Harmonica |
| 5 Chorused piano | 11 Vibraphone | 17 Percussive organ | 23 Tango accordion |
Guitar, Bass, Strings
| 24 Acoustic guitar (nylon) | 30 Distortion guitar | 36 Slap bass 1 | 42 Cello |
| 25 Acoustic guitar (steel) | 31 Guitar harmonics | 37 Slap bass 2 | 43 Contrabass |
| 26 Electric guitar (jazz) | 32 Acoustic bass | 38 Synth bass 1 | 44 Tremolo strings |
| 27 Electric guitar (clean) | 33 Electric bass (finger) | 39 Synth bass 2 | 45 Pizzicato strings |
| 28 Electric guitar (muted) | 34 Electric bass (pick) | 40 Violin | 46 Orchestral harp |
| 29 Overdriven guitar | 35 Fretless bass | 41 Viola | 47 Timpani |
Ensemble, Brass, Reed
| 48 String ensemble 1 | 54 Synth voice | 60 French horn | 66 Tenor sax |
| 49 String ensemble 2 | 55 Orchestra hit | 61 Brass section | 67 Baritone sax |
| 50 Synth. strings 1 | 56 Trumpet | 62 Synth. brass 1 | 68 Oboe |
| 51 Synth. strings 2 | 57 Trombone | 63 Synth. brass 2 | 69 English horn |
| 52 Choir Aahs | 58 Tuba | 64 Soprano sax | 70 Bassoon |
| 53 Voice Oohs | 59 Muted trumpet | 65 Alto sax | 71 Clarinet |
Pipe, Synth Lead, Synth Pad
| 72 Piccolo | 80 Lead | 1 (square) | 88 Pad | 1 (new age) | 96 FX | 1 (rain) |
| 73 Flute | 81 Lead | 2 (sawtooth) | 89 Pad | 2 (warm) | 97 FX | 2 (soundtrack) |
| 74 Recorder | 82 Lead | 3 (calliope) | 90 Pad | 3 (polysynth) | 98 FX | 3 (crystal) |
| 75 Pan flute | 83 Lead | 4 (chiff) | 91 Pad | 4 (choir) | 99 FX | 4 (atmosphere) |
| 76 Bottle blow | 84 Lead | 5 (charang) | 92 Pad | 5 (bowed) | 100 FX | 5 (brightness) |
| 77 Shakuhachi | 85 Lead | 6 (voice) | 93 Pad | 6 (metallic) | 101 FX | 6 (goblins) |
| 78 Whistle | 86 Lead | 7 (fifths) | 94 Pad | 7 (halo) | 102 FX | 7 (echoes) |
| 79 Ocarina | 87 Lead | 8 (brass) | 95 Pad | 8 (sweep) | 103 FX | 8 (sci-fi) |
Ethnic
| 104 Sitar | 106 Shamisen | 108 Kalimba | 110 Fiddle |
| 105 Banjo | 107 Koto | 109 Bagpipe | 111 Shanai |
Percussive
| 112 Tinkle Bell | 114 Steel Drums | 116 Taiko Drum | 118 Synth Drum |
| 113 Agogo Bells | 115 Woodblock | 117 Melodic Tom | 119 Reverse Cymbal |
Sound Effects
| 120 Guitar fret noise | 121 Breath noise | 122 Seashore | 123 Bird tweet |
| 124 Telephone ring | 125 Helicopter | 126 Applause | 127 Gunshot |
Roll the Drums!
 Now that you’ve learned how to use various
instruments, let’s move on to the percussion instruments. These
instruments, like drums and cymbals, are different from the usual
instruments. Instead of having instrument numbers, a special MIDI
channel (#10) has been set aside for percussion instruments only, and
you use notes to play the various percussion instruments.
Now that you’ve learned how to use various
instruments, let’s move on to the percussion instruments. These
instruments, like drums and cymbals, are different from the usual
instruments. Instead of having instrument numbers, a special MIDI
channel (#10) has been set aside for percussion instruments only, and
you use notes to play the various percussion instruments.
This is the standard MIDI assignment for percussion instruments on channel #10. As you can see, the first instrument corresponds to note #35 (or the note B in octave 2), and the last instrument, a triangle, is actually note #81 or the note A in octave 6.
MIDI Percussion List
| Note | # | Name | Note | # | Name | Note | # | Name |
|---|---|---|---|---|---|---|---|---|
| B2 | 35 | Acoustic Bass Drum | C3 | 36 | Bass Drum 1 | Db3 | 37 | Side Stick |
| D3 | 38 | Acoustic Snare | Eb3 | 39 | Hand Clap | E3 | 40 | Electric Snare |
| F3 | 41 | Low Floor Tom | Gb3 | 42 | Closed Hi-Hat | G3 | 43 | High Floor Tom |
| Ab3 | 44 | Pedal Hi-Hat | A3 | 45 | Low Tom | Bb3 | 46 | Open Hi-Hat |
| B3 | 47 | Low-Mid Tom | C | 48 | Hi-Mid Tom | Db | 49 | Crash Cymbal 1 |
| D | 50 | High Tom | Eb | 51 | Ride Cymbal 1 | E | 52 | Chinese Cymbal |
| F | 53 | Ride Bell | Gb | 54 | Tambourine | G | 55 | Splash Cymbal |
| Ab | 56 | Cowbell | A | 57 | Crash Cymbal 2 | Bb | 58 | Vibraslap |
| B | 59 | Ride Cymbal 2 | C5 | 60 | Hi Bongo | Db5 | 61 | Low Bongo |
| D5 | 62 | Mute Hi Conga | Eb5 | 63 | Open Hi Conga | E5 | 64 | Low Conga |
| F5 | 65 | High Timbale | Gb5 | 66 | Low Timbale | G5 | 67 | High Agogo |
| Ab5 | 68 | Low Agogo | A5 | 69 | Cabasa | Bb5 | 70 | Maracas |
| B5 | 71 | Short Whistle | C6 | 72 | Long Whistle | Db6 | 73 | Short Guiro |
| D6 | 74 | Long Guiro | Eb6 | 75 | Claves | E6 | 76 | Hi Wood Block |
| F6 | 77 | Low Wood Block | Gb6 | 78 | Mute Cuica | G6 | 79 | Open Cuica |
| Ab6 | 80 | Mute Triangle | A6 | 81 | Open Triangle |
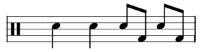
Let us have a real-world example. This considered to be the most basic rock rhythm:
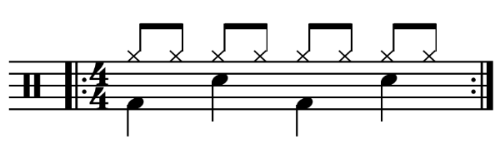
The top line is a hi-hat beating at 1/8 notes. The middle line is the snare drum, and the bottom line is the bass drum.
Without the hi-hat, using the bass and snare drum is quite straightforward. The bass drum corresponds to the note C3, and the snare to D3. Use a slower, more heavy tempo like T80, and this is what you’ll get:
PLAY [T80 M10 C3 D3 C3 D3]
To fill in the hi-hat, which is note Gb3 or number 42, you will need to use chords, because you want to fire both a drum and the hi-hat at the same time. Also, the basic time unit should be 1/8 note, not 1/4 note: you get this unit with the L8 command. And here is the complete command:
PLAY [T80 M10 L8 [C3 Gb3] Gb3 [D3 Gb3] Gb3]
Have the command repeat to enjoy the intricate rhythm:
(PLAY [T80 M10 L8 [C3 Gb3] Gb3 [D3 Gb3] Gb3] TRUE)
Here is the final sound:
Special Effects
Logo supports a few special effects, which we’ll touch briefly here.
Sustain
If you use the “+” command, Logo keeps all following notes turned on till the next Pause command, of until the list ends. Try this:
PLAY [+ C D E F G]
Reverb
You can add a reverb effect to a channel with the REV command:
PLAY [REV50 C E G]
Vibrato
 Finally, you can add a vibrato effect to a channel,
causing a note to change its frequency about five times a second. You
may know this effect from singers. The more vibrato you apply, the
stronger it is. A value of 0 turns the vibrato off, while a value of 127
causes an almost intolerable vibrato.
Finally, you can add a vibrato effect to a channel,
causing a note to change its frequency about five times a second. You
may know this effect from singers. The more vibrato you apply, the
stronger it is. A value of 0 turns the vibrato off, while a value of 127
causes an almost intolerable vibrato.
Note: The Web synthesizers on the Safari browser on Apple devices ignore vibrato.
PLAY [VIB70 C E G]
Stereo Panning
You can decide on which stereo channel a MIDI channel is supposed to play. In MIDI terms, this is called “stereo panning”. The PAN command has a suffix value from 0 till 127. the value 64 means that the channel is exactly in the middle; the value 0 moves the channel to the far left, and the value 127 moves the channel to the far right in the stereo space. If you have stereo speakers connected to your PC, try this:
PLAY [R PAN 0 C PAN 127 D]
Note: The Web synthesizers on the Safari browser on Apple devices ignore stereo panning.
A Rock Band
 As a last challenge, let us try to assemble a small
piece of music, the beginning of Jimi Hendrix’ “Purple Haze”. Let’s not
go into all of the tiny notes, but stick with the general
idea.
As a last challenge, let us try to assemble a small
piece of music, the beginning of Jimi Hendrix’ “Purple Haze”. Let’s not
go into all of the tiny notes, but stick with the general
idea.
Here’s the original piece of music, at least
the six bars that you are going to do:
For those who want to watch a video at YouTube:
Part 1: The Bass
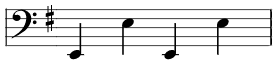 The bass part is pretty simple and
straightforward. It is always the same phrase for all six bars. Note
that the command “R” resets the player for a fresh start, and then use
eights to write notes, because you want the pauses as well. Use
instrument #38 (Synth Bass 1).
The bass part is pretty simple and
straightforward. It is always the same phrase for all six bars. Note
that the command “R” resets the player for a fresh start, and then use
eights to write notes, because you want the pauses as well. Use
instrument #38 (Synth Bass 1).
PLAY [R L8 I38 E2 P E3 P E2 P E3 P]
or, with a RPT command:
PLAY [R L8 I38 [RPT2 E2 P E3 P]]
That was quite easy.
Part 2: The Drums
 The drums are quite easy as well. The snare
beats on every quarter note, and the bass drum beats on the 1/8 notes 6
and 8. You need to use MIDI channel 10 as the percussion channel. For
the snare, use note D3 (Acoustic Snare), and for the bass drum, use note
B2 (Acoustic Bass Drum).
The drums are quite easy as well. The snare
beats on every quarter note, and the bass drum beats on the 1/8 notes 6
and 8. You need to use MIDI channel 10 as the percussion channel. For
the snare, use note D3 (Acoustic Snare), and for the bass drum, use note
B2 (Acoustic Bass Drum).
PLAY [CHAN10 D3 D3 L8 D3 B2 D3 B2]
Good enough.
Part 3: The Guitar


Now, you need to play Jimi Hendrix himself! The first two bars are easy as well, followed by the melody. Put it together like this, using instrument 30 (Distortion Guitar). Repeat the first phrase 4 times (each part is half a bar, so you get two bars), then repeat the melody two times.
PLAY [L8 I30 [RPT4 A3 P A4 P] [RPT2 B4 D5 G5 5'8A4 G4 D4 E3 5'8E]]
Putting it Together
Now that you have the three instruments laid out, assign them to several MIDI channels. Use MIDI channel 1 for the guitar, channel 2 for the bass and channel 10 (remember, this is the percussion channel) for the drums.
For the drums and the bass, use Logo’s Open Repeat feature. If you do not supply a repeat count, Logo simply plays the channel again and again until the song ends. The song, in this case, is the guitar solo. Also, the drums are quiet during the first two bars, so use the command “1P2” (a full bar pause for two bars) to start the channel, before the drum repeat loop begins. Note that the Note Length specifier has to be set for each channel separately.
Also, Jimi played the tune a little slower, so let us use tempo 100 (command T100).
Here we go:
PLAY [R T100
  [CHAN1 L8 I30 [RPT4 A3 P A4 P] [RPT2 B4 D5 G5 5'8A4 G4 D4 E3 5'8E]]
  [CHAN2 L8 I38 [RPT E2 P E3 P]]
  [CHAN10 S0 1P2 [RPT L4 D3 D3 L8 D3 B2 D3 B2]]
]
And here is the final result:
OK, this is nowhere near Jimi Hendrix’s guitar, but it sounds pretty darn cool. And it was amazingly easy to create this piece of music.
Record Your Music
Would you like to send off your music to someone else? No problem! You can record the MIDI commands that your music uses and save them to a .MID file. This is how you do it:
; turn on MIDI recording MIDI.RECORD TRUE ; play your music; you will not hear anything. ; MY.MUSIC is supposed to contain your music commands. PLAY :MY.MUSIC ; end recording and save to MUSIC.MID MIDI.RECORD “X.MID
Please check the MIDI.RECORD command for more details.
Also, PLAY can play a MIDI file. In the Web version, you need to have the file either on Dropbox or in the Files panel so Logo can find it.
Complete Command Table
Every command can have a length prefix as a number or as a note measure with an apostrophe (like e.g. 3’8), and a numeric suffix. Note commands are caseless. For more examples, please visit our Logo Library and select “Music”.
| Command | Scope | Explanation | Example |
|---|---|---|---|
| R (reset) | Song | Resets octave, note length, volume, reverb, staccato, instrument, and sustain to their default values and stops all music. | R |
| T (tempo) | Song | The suffix defines the tempo of the entire song in beats per minute (BPS) a.k.a. quarter notes per minute. The default value is 120. The tempo carries over to the next PLAY command. | T100 |
| C D E F G A B | Channel | Basic notes. Notes may be flattened with an “b” suffix, or sharpened with a “#” suffix. A dot behind the note extends the note by half of its length. The suffix is the octave number (0…6). | Bb6 3’8C# Eb. |
| N (note) | Channel | Play a note with its number as the suffix (0…127). This lets you play direct notes without worrying about the note name or the octave. It makes most sense when you create a percussion channel, where N35, for example, would be the Acoustic Bass Drum. | [CHAN10 [RPT N35]] |
| P (pause) | Channel | Pause, works the same way as a note, just silent. Notes may be flattened with an “b” suffix, or sharpened with a “#” suffix. A dot behind the note extends the note by half of its length. The suffix is a value that the length specified is multiplied with. For example, “1P2” creates a pause of 2*1 = 2 bars. | 1P2 2’1P |
| [notes] | Channel | Plays the notes in the list as a chord. | [C E G BB] |
| BK (back) | Channel | Move the timeline back. The length specifiers are the same as for notes. Use this command to move the entire timeline back in time so you can add additional notes to a channel. This can create more interesting effects than simple chords, and is important for more complex drum arrangements. The command is valid till the end of the list; you can use it to move a few notes back in time with an embedded list. | 3’8BK |
| FD (forward) | Channel | Move the timeline forward. This command has the opposite effect of the BK command; it moves the remainder of the list forward in time. | FD. |
| L (length) | Channel | Sets the default length of a note. After a reset, the length is 4, corresponding to a quarter note. The length carries over to the next PLAY command. | L4 C L8 D E |
| O (octave) | Channel | Sets the octave of the following notes. The suffix is the octave number (0…6). After a reset, the octave is 4. The command “O#” increases the octave by one, and the command “Ob” decreases the octave by one. The octave value carries over to the next PLAY command. | L4 C L8 D E |
| I (instrument) | Channel | Selects an instrument for a channel. The suffix is the instrument number (0…127). The instrument carries over to the next PLAY command. | I19 [C E G] |
| V (volume) | Channel | Sets the overall channel volume (0…127). After a reset, the volume is set to 100. The volume carries over to the next PLAY command. | C V64 E V32 G |
| S (staccato) | Channel | Sets the staccato amount for the following notes (0…99). This determines how log a note is played within its length. A small value like e.g. 10 plays very short notes, followed by a small pause until the note length (e.g. a quarter note) has been played. After a reset, the staccato value is 95, creating a tiny pause between notes. The staccato carries over to the next PLAY command. | S 10 C D E |
| + (sustain) | Channel | This command causes all notes to stand until a pause is reached, or the list ends. Note that if you use sound samples, a note may end prematurely when the sound ends. | + C D E |
| M (MIDI) | Song | In Logo 4, you could switch the channel with the M command. It suffix is the channel number (1…16). It was useful to switch to the percussion channel. You should avoid this command, and use the CHAN command instead. This command carries over to the next PLAY command. | I5 C M2 I7 C |
| CHAN (channel) | Song | CHAN selects the channel into which all following commands are recorded. This command should be used as the first element of a list of commands. Using various command lists with different channels lets you create music for multiple instruments, so you can actually create your own band. | [CHAN2 I28 C D E] |
| REV (reverb) | Channel | Adds a reverb effect to the channel (0…127). | REV10 C D E |
| RPT (repeat) | Channel | Repeats the following notes the number of times that the suffix says. RPT2, for example, repeats all following notes twice. RPT without a suffix causes Logo to repeat the notes as often as required until the song ends. You should, therefore, have a melody channel with a fixed length so Logo knows when to stop the repeat. If you use RPT in a list, it must be the first command of that list. | C [RPT2 D E] |
| PAN (panning) | Channel | Determines the stereo position of the MIDI channel (0…127). A value of 0 puts the MIDI channel on the left speaker only, 64 puts it into the middle, and 127 puts it on the right speaker only. | PAN0 C PAN127 E |
| VIB (vibrato) | Channel | Adds a vibrato effect to the channel (0…127). | VIB10 C D E |