Become a Publisher
Logo Apps are discontinued and will be removed April 1, 2025!
We are working on a new version of Terrapin Logo that will include disk I/O for the Logo Web app. This makes it necessary to abandon the ability to publish an app, and to execute a published app.
Interested people can always download the Zip file that contains the app. The updated Logo version will hopefully be able to load the Logo workspace file from disk along with all images and media that the unzipped file contains.
The following info will be kept until April 1, 2025.
So you’ve written a great program that you would like to share? Here is the good news: Logo lets you create real Internet apps that you can share with everybody! You can run your app everywhere, from the PC to tablets to smartphones.
We have reserved a special Internet domain for your apps, logoapps.net.
When you publish your app, you choose a name of your liking, click
Publish, and your app is immediately available for others. Let us say
that you chose the name “bang”, your app’s Internet address would be
https://bang.logapps.net.
So you even get your own Internet address!
This chapter guides you through the necessary steps, and provides hints about how to adapt your app to the different screen sizes of PCs, tablets, and smartphones.
What Will Be Published?
 In short, you will publish the contents of
your ~FILES storage. This includes all files that you have saved there,
loaded from a Zip archive, or dropped there, including any directories
that you created with the CREATE.DIR
command, sounds, images, LGO files — really anything goes into that Zip
archive. Technically speaking, you save the contents of your workspace
to our server instead of your local disk.
In short, you will publish the contents of
your ~FILES storage. This includes all files that you have saved there,
loaded from a Zip archive, or dropped there, including any directories
that you created with the CREATE.DIR
command, sounds, images, LGO files — really anything goes into that Zip
archive. Technically speaking, you save the contents of your workspace
to our server instead of your local disk.
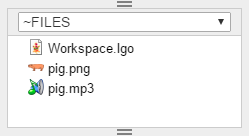
Before
Logo publishes your app, it saves the contents of your Logo workspace
into a file “Workspace.lgo” into the ~FILES storage. There is no need
for you to issue a SAVE command yourself.
Preparing your Program
Before you publish, you need to create a procedure called MAIN. There
is a simple explanation for this. When Logo loads a Logo file, it runs
its contents, including all commands it finds. You may now wonder why
you do not simply enter the commands required to run your program into a
LGO file and save that file to your ~FILES storage. If you only had a
single LGO file in your ~FILES storage, this would also be fine, but
imagine you had more than one LGO file.
When a user types in your Internet link to your app (explained below), Logo loads the saved Zip archive and scans it for LGO files. It only scans the top level of that Zip archive; it does not scan subdirectories. The problem with commands embedded into these LGO files is that Logo scans these files in no particular order. If a command in one file depends on a command in another file, you run into a bug problem if the files are executed in the wrong order.
This is where the MAIN procedure chimes in. If you collect all
commands required to run your app into the MAIN procedure, this acts
as a centralized location where your program is initialized and
executed, with a well-defined order of commands. After all, you wrote
MAIN, right?
So, when Logo executes an app, it first loads all toplevel LGO files
in no particular order. Then, Logo looks for the MAIN procedure and
runs it to start your program.
Actually, you cannot publish a program if you did not define a MAIN
procedure!
A few words about the current directory. Remember the discussion about storages in the chapter “Where are My Files?”? Usually Logo starts with the current storage set to the local disk (storage ~PC). A Logo app is supposed to run entirely self-contained, thus not relying on local data. All data should already be in the ~FILES storage. Therefore, Logo automatically switches to the ~FILES storage when running an app, or when you edit your app. This makes running an app a little different from running Logo itself.
If you want the user to load local data from within your app, make sure to use the SETCURDIR command to switch the storage to ~PC before presenting the user with a File Select dialog.
ABOUT my App
Remember the “About…” menu item? This is where an unsuspecting user clicks to find out about your program. So, clicking the menu item should produce an alert containing information about your program, such as how to use it, etc.
Usually, Logo would display the description that you are going to add
(see below), but you are free to create an ABOUT procedure. This
procedure should display an ALERT containing the
required information (do not forget to ignore the result of the
ALERT command, which in all likelihood would be
the word “OK”).
See this small example procedure for an alert box:
about.lgo
TO ABOUT
  IGNORE ALERT "|This is all about my program.\nThis is a second paragraph.|
END
The special character \n inserts a line feed. See the
PRINT command for details about special
characters.
If Logo finds an ABOUT procedure, it will happily call that procedure
instead of displaying your app’s description. Your ABOUT procedure
could, of course, also PRINT text to the Listener
panel if you prefer this over an alert box. It is all up to you!
Publish!
Have you created your MAIN procedure? You are sure that your program
is bug-free? Then publish it. Click “Publish…” from the Tools menu, and the Publish dialog opens.

Let’s go through all fields:
App name: This is the name of your app, which is the first part of “.logoapps.net”. You are free to choose whatever name you like, but Logo will check if the name is available as you type, which may cause a slight delay. Also, you are restricted to lower-case letters, digits, and the minus sign. Choose wisely.
The title of your app: The title is displayed in the browser tab of your app. It should be short and descriptive.
Description: This is a one-liner that describes your app. It appears
in the listing of all apps, and in the About box if you did not define
your own ABOUT procedure.
Author: This is your name. You can keep it or change it to a nickname. Classroom users cannot change the name of the author.
Tags: Select the tags that you think are relevant for others when they try to find your app. Your tags go into the tag cloud on the main page at https://www.logoapps.net. You do not need to enter any tags.
Your app is visible to everybody: If you check this box, your app is listed, and your tags appear in the tag cloud. If you uncheck this box, only users who know your app’s Web link can run the app.
Others can download your code: If you check this box, a small download icon appears in the listing of your app, and users can click this icon to download your app’s Zip archive so they can look at your program.
Fix Your App
Once the apps has been published, you may want to change the wording, or the code itself. If you look at the list of all apps in the Apps dialog, you will notice that your apps have three little symbols to the right of the list entry.

You can click any of these symbols:
 Download the app as a Zip archive. This lets
you save the app in a secure location.
Download the app as a Zip archive. This lets
you save the app in a secure location.
 Download and edit your app. Logo opens and loads
the app, but it does not run the
Download and edit your app. Logo opens and loads
the app, but it does not run the MAIN procedure. You can edit any
procedure, add or remove images or sounds, and click “Publish…” again to
re-publish the app. The EDALL command lets
you edit all of your workspace in one big chunk, while the
EDPS command lets you edit all procedures.
 Delete the app. If you do not want the app
anymore, click this symbol to delete it entirely. You may want to
download it first to have a backup in case you change your mind.
Delete the app. If you do not want the app
anymore, click this symbol to delete it entirely. You may want to
download it first to have a backup in case you change your mind.