Turtles and Colors
You’ve already seen the turtle, quietly sitting in the center of the Graphics panel, patiently waiting for you to tell it what to do. Well, the waiting is over! You’re about to enter the fascinating world of turtle graphics, a special way of drawing interesting, exciting, and colorful graphics on your computer screen by telling a turtle what to do. Not a real turtle, of course.
The Logo turtle is a special graphics cursor that can move forward or back, rotate right or left, change color, change size, change shape and even disappear. There’s even more, but let’s do something now.

 Type
Type FORWARD 100
and watch what happens. The turtle moves in the direction that its head
is pointing; the line it draws is 100 turtle steps long (that’s how
turtles measure distance).
Now, type RIGHT 90 and
you’ll see the turtle rotate like it’s peeking around a corner. Turns
are measured in degrees, but they’re not called turtle degrees because
that’s how turns are measured for just about everything, from boats and
planes to spaceships.
 If you type these two instructions again and again
and again, you’ll get pretty tired of typing! Here’s a shortcut: type
If you type these two instructions again and again
and again, you’ll get pretty tired of typing! Here’s a shortcut: type
FD 100 RT 90 all on the same line before you press Enter. FD is
short for FORWARD and RT is short for
RIGHT. Next, just press the up-arrow key to
recall the command line into the input panel and then press Enter.
What could be easier? You’ll see.
Repeat
There is a very simple way to repeat instructions without typing the
same thing over and over again. It’s the REPEAT command. But before you
can use it, you need to learn a little bit about a special type of Logo
data called a list. A list starts with [ and ends with ]. In
between the brackets is where you put the instructions you want
repeated. Lists are used a lot in Logo but that’s enough to know for
now.
 The REPEAT command needs
a number and a list. The number tells it how many times to repeat and
the list tells it what to repeat. So, to repeat the earlier drawing,
type
The REPEAT command needs
a number and a list. The number tells it how many times to repeat and
the list tells it what to repeat. So, to repeat the earlier drawing,
type REPEAT 4 [FD 100 RT 90]. That’s a lot easier than typing the
instructions four times.
Don’t forget about the
up-arrow key: it’s still worth using if you make a mistake or if you
just want to change a previous line of instructions. Let’s say you want
to change the REPEAT we just used so that the turtle does the opposite
of what it did last time. The opposite of FD is BK (short for
BACK) and the opposite of RT is LT
(short for LEFT). See what happens when you
change both instructions to their opposite and then change just one at a
time. Is this a pain? It should be. Try this next: REPEAT 3 [PRINT
"HA].
If your Graphics panel is getting a little messy, just type CS to
clean it up and start drawing again. (CS is short for
CLEARSCREEN.) You can clean up the
Listener panel by typing CT (short for
CLEARTEXT).
More About the Turtle
There are many Logo commands for the turtle. You can’t learn them all at once, but it makes sense to learn them in pairs or groups. Commands that are opposites are easy to learn at the same time. You already know the FORWARD and BACK opposites and the RIGHT and LEFT opposites. Here are some others you can try out:
PENUP or PU - the turtle won’t draw lines
now
PENDOWN or PD - the
turtle will draw lines again
Where’s the pen? It’s right in the middle of the underside of the turtle. If the pen didn’t go up and down, you’d have a hard time making your drawings look nice. Try it with a pencil and some paper and you’ll see what I mean.
Does your pencil have an eraser? The turtle’s pen does.
PENERASE or PE - erases a drawing
Erasing in the Graphics panel is not exactly the same as erasing pencil
lines from paper but the effect is the same — what was there is now
gone. To see this happen quickly, try FD 100 PE BK 100 but don’t
forget to put the pen back down when you’re done! Here’s one more pen
trick.
PENREVERSE or PX - inverts the
colors under the pen
This special pen flips colors when it passes over them. In computer speak, the color’s bits are inverted; black becomes white, red becomes yellow, and more. Try to create a drawing, set the turtle’s pen width to, say 10, and draw over your drawing to see interesting color effects!
If the turtle is moving too quickly to follow, type
SLOWTURTLE to slow it down. Type
SETSPEED 1 to restore normal speed.
The Turtle Continued
 When you finish a drawing, do you leave your pencil
in it?
When you finish a drawing, do you leave your pencil
in it?
HIDETURTLE
or HT - the turtle disappears
SHOWTURTLE or ST - the turtle
reappears
Hiding the turtle makes drawing faster
and gets the turtle out of the way. Showing the turtle helps you see
which way it’s heading and where it is. If your turtle gets lost, type
HOME to quickly get the turtle back to the
center of the Graphics panel. If you still don’t see it, type ST for
SHOWTURTLE.
 When the point
of your pencil gets dull, the lines get wider. The turtle’s pen never
gets dull but you can change its width from 1 to 99. Width 1 is the
default. You may not even see the turtle with a very wide
pen!
When the point
of your pencil gets dull, the lines get wider. The turtle’s pen never
gets dull but you can change its width from 1 to 99. Width 1 is the
default. You may not even see the turtle with a very wide
pen!
 SETWIDTH or
 SETW -
changes the pen width (1–99)
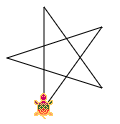
With all the commands
you know so far, you can make some interesting special effects. The star
illustration looks very complicated to create. In fact,
the star was drawn with SETW 10 and then erased with SETW 4.
PD SETW 10 REPEAT 5 [FD 100 RT 144]
PE SETW 4 REPEAT 5 [FD 100 RT 144]
See what you can do. Just play around.
Add Some Color
Coloring with the turtle is simple and fun! You can choose from endless
colors, but let’s keep it simple for now.
SETPC - sets the pen color (0–137)
SETPC needs a number from 0 to 137.
Try any color you want. Pick your favorite.
What about SETPC 15? Try it. When Logo
starts up, the Graphics screen is white. If you draw with the same color
as the background, it’s like not drawing at all. What if you want to
draw in white?
SETBG -
sets the background color (0–137)
SETBG needs a number from 0 to 137 just like SETPC.
Do you want a green square? Or, a blue star? Just change the pen color and then use the up-arrow key to recall a previous command line and press Enter.
Can you make a red diamond? A diamond is really just a square that’s turned sideways a little.
 A Logo color is a three-element list. Each
element is a value between 0 and 255, which stands for the intensity of
one of the colors red, green, and blue. The first element is the Red
value, the second is the Green value, and the third is the Blue value.
This color model is often also called the RGB model. Guess
why?
A Logo color is a three-element list. Each
element is a value between 0 and 255, which stands for the intensity of
one of the colors red, green, and blue. The first element is the Red
value, the second is the Green value, and the third is the Blue value.
This color model is often also called the RGB model. Guess
why?
The color black would, therefore, be [0 0 0]
(all base colors turned off), and white is [255 255 255] (all three
colors at full strength). A bright red would be [255 0 0]. You get the
idea?
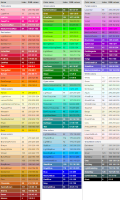
This page contains a list of the
standard colors, their names, their indexes, and their RGB
values.
Luckily, all color commands accept either a
color index, an RGB list, or a color name. So, these commands are fully
equivalent:
SETPC 60
SETPC [255 215 0]
SETPC "GOLD
To ease the conversion, Logo has the COLOR command, which reports the RGB color, the COLORINDEX command which reports a color index, and the COLORNAME command, which reports a color name. Just try this:
COLOR “GOLD Result: [255 215 0 1]
 But wait! Why are we getting four instead of
three values?
But wait! Why are we getting four instead of
three values?
Well, Logo can do much more with
colors! The fourth value is the alpha or transparency value. This is a
value between 0 and 1 that indicates how transparent the color is. A value of 0
means that the color is so transparent that it is invisible, and 1 means
no transparency at all. If you do not use that value, Logo assumes a
fully opaque color (the value 1).
You can set the
value that Logo should use if you do not specify an alpha value in the
color list with the SETALPHA command.
This lets you use color names or indexes even with transparency. Now
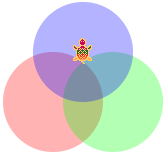
imagine how much fun you can have if you start blending colors
together! The overlapping circles to the left are easily created with
these commands:
PU SETX -30 PD SETPC (LIST 255 0 0 0.3) (STAMPOVAL 50 50 TRUE)
PU SETX 30 PD SETPC (LIST 0 255 0 0.3) (STAMPOVAL 50 50 TRUE)
PU SETXY [0 50] PD SETPC (LIST 0 0 255 0.3) (STAMPOVAL 50 50 TRUE)
This extended RGB color model is usually called RGBA. Surprise!
The Toolbox panel has a “Colors” panel. From the Colors panel, you can use your mouse to drag a color and drop it on the Graphics panel to set the background color, or you can drop a color on a turtle to set its pen color.
Turtle Shadows and Colors
Every turtle has a shadow. It is initially invisible, but you can turn it on. A turtle’s SHADOW property determines how far a turtle’s shadow is away from the turtle itself. Usually, this is the value 0, which means that the shadow is invisible. If you, for example, set the turtle’s shadow to be, say, five pixels apart, you would enter this command:
SETSHADOW 5
And all of a sudden, the turtle would have a shadow!

Instead of a shadow, you could also make the turtle “glow” by setting its GLOW property together with the SHADOW property:
PPROP 0 "GLOW TRUE
And the turtle would “glow” with a grey glow.
