Part Four
The Turtle Center
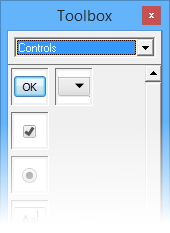
 The Turtle Center is a dialog box
that lets you change some of the turtle characteristics. You can click
on the Turtle Center button in the Tool bar or select Turtle Center
from the Preferences menu. This Turtle Center is a quick way to
change items for all active turtles. If you remove the check mark in
Tell all active turtles, then the changes you make will affect just
the first turtle in the WHO list (usually
turtle 0, but turtle names could change that).
The Turtle Center is a dialog box
that lets you change some of the turtle characteristics. You can click
on the Turtle Center button in the Tool bar or select Turtle Center
from the Preferences menu. This Turtle Center is a quick way to
change items for all active turtles. If you remove the check mark in
Tell all active turtles, then the changes you make will affect just
the first turtle in the WHO list (usually
turtle 0, but turtle names could change that).
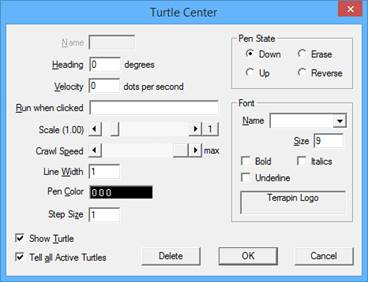
To display the Turtle Center for a specific turtle, put the mouse pointer over a turtle and right click (on a PC) or ctrl-click (on a Mac). The changes you make will affect only the specific turtle. However, all active turtles are affected if you check the Tell all active turtles box.
Did you notice the Run when clicked property? Type FD 100 RT 90 into
the text box and then click OK. When you click on the turtle in the
Graphics window, these commands are run as if they were typed in the
Listener - all active turtles will respond. You can use
ASK if necessary.
Now make sure the Extended Property Lists option is checked. It’s in the Operation dialog under the Preferences menu.
Properties of …
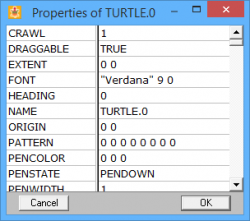 To display the Properties window of
something, put the mouse pointer over it and right click (on a PC) or
Ctrl-click (on a Mac). You can also type EDP
and give it the name of that something or, in the case of a turtle, you
can use the turtle’s number. EDP stands for
edit properties.
To display the Properties window of
something, put the mouse pointer over it and right click (on a PC) or
Ctrl-click (on a Mac). You can also type EDP
and give it the name of that something or, in the case of a turtle, you
can use the turtle’s number. EDP stands for
edit properties.
Many things in Terrapin Logo
have their own property list - turtles, windows, and things we haven’t
seen yet. A property list is a special kind of list containing property
pairs; a property pair is a property name and a property value that is
associated with that property name. That’s a rather long-winded
definition, but it’s important.
Pay close attention
to the RUN and RUN2 properties. You can put commands in one or the
other, but not both. A single mouse click will run the RUN
commands; it takes a double-click to run the RUN2 commands. In either
case, the commands are run as if you typed them in the Listener
window.
If the Extended Property List option is
not on, then only the most common properties are shown, much like the
Turtle Center.
Property List Commands
There are many Logo commands that indirectly affect many of the properties of objects. However, some properties can only be modified with either the property list editors or the property list commands. The property editors are convenient while you’re exploring but, in a procedure, you may have to use the property list commands.
Get a property value
GPROP is an operation that reports (or
outputs) a property value. It needs two inputs - the name of the object
and the property name whose value you want. For example, GPROP 0
“PENWIDTH. If you use a property name that is not in the property
list, GPROP outputs the empty list (a
pair of brackets with nothing between them, []).
Put a property pair
 PPROP is a
command that either adds a new property pair or modifies an existing
property value. It needs three inputs - the name of the object, the
property name and the value you want to assign. For example,
PPROP is a
command that either adds a new property pair or modifies an existing
property value. It needs three inputs - the name of the object, the
property name and the value you want to assign. For example, PPROP 0
“PLANET “EARTH.
Put many property pairs
PPROPS is really a shortcut form of
typing a lot of PPROP commands. It needs
two inputs - the name of the object and a list of property pairs. For
example, PPROPS 0 [PLANET EARTH RUN [FD 100 RT 90]] is the same as the
two commands PPROP 0 “PLANET “EARTH and PPROP 0 “RUN [FD 100 RT 90].
Now make sure the ”Extended Property Lists” option is NOT checked. It will make changes quick and convenient while playing with the bitmaps.
Animals, Birds, Fish and Other Pictures
 Finally! We’re ready to explore and play
around with some very colorful objects called bitmaps. Bitmaps are a lot
like turtles except they don’t have a pen and they are multicolored.
Terrapin Logo includes many different bitmaps and you can add more of
your own.
Finally! We’re ready to explore and play
around with some very colorful objects called bitmaps. Bitmaps are a lot
like turtles except they don’t have a pen and they are multicolored.
Terrapin Logo includes many different bitmaps and you can add more of
your own.
Open the Toolbox and then select the Sea
Creatures panel and drag a whale out to the Graphics window. Right click
(on a PC) or ctrl-click (on a Mac) anywhere on the whale to bring up the
property dialog. Set the heading, set the velocity, type in the command
PLAY “SPLASH in the Run box, make the whale bigger or smaller with the
Scale slider and click OK. Watch the whale move and then click on it to
hear a splash! Drag out some friends and make an aquarium.
Try running the SAIL procedure from earlier and then change
it into a whale watch. Use the Vehicles panel and make a car race. Try
PLAY “CARMOTOR and PLAY “CARHORN. 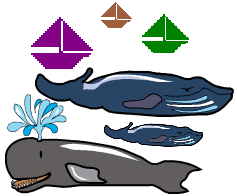
Controls (Click on This!)
The Toolbox Controls panel has a variety of controls that make your
programs easier for others to use. You have probably seen all of these
controls somewhere before, either in Logo or in other applications that
you run on your computer. They are standard visual programming tools for
developing a Graphical User Interface (GUI). Now, you can put them in
your own Logo programs!
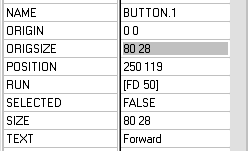
 All of the controls can be placed
in the Graphics window by dragging them with the mouse. Each control is
given a name, like
All of the controls can be placed
in the Graphics window by dragging them with the mouse. Each control is
given a name, like BUTTON.1 for the first button and BUTTON.2 for
the second button. You can change the name in the properties dialog or
with the PPROP command. You can also
create controls with the DECLARE and
NEW commands. To move a control, hold down
the Shift key while dragging it to a new location. Controls can be given
commands just like bitmaps - using ASK or
TELL. To get rid of a control, type
ERASE and give it the name of the control.
When you type CLEARSCREEN to clear
the screen, all of the controls are erased.
There
are eight different controls. The Editbox, Listbox, and Popup listbox
are used to get text input; the Checkbox and Radiobutton are used to
indicate a choice (like true/false or yes/no); the Textbox is for
displaying text; the Scrollbar (or slider) is for getting a number that
is always in a certain range; the Button is for starting some action.
Who’s Got the Remote?
This sample project is a “remote control” for moving the turtle around,
drawing lines, and cleaning up the screen. Sometimes, the best way to
learn about new things is to try them out. You can read more in
Help.
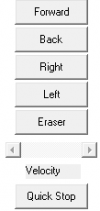 First, drag five
buttons onto the Graphics window and arrange them in a column with a
little space between them. Don’t spend a lot of time trying to get them
perfect from side to side - let Logo do that! Type
First, drag five
buttons onto the Graphics window and arrange them in a column with a
little space between them. Don’t spend a lot of time trying to get them
perfect from side to side - let Logo do that! Type ASK EVERY “BUTTON
[SETX 250]. Now drag out a scrollbar, a static text box and another
button. Your “remote” should look like the illustration here, except for
the labels. The label of a control is the TEXT property. Use the
property editor to display the properties of each control and change the
label to match the example. Adjust the POSITION property to line up
the other controls. The first number is the X-coordinate (left-to-right
position) and the second number is the Y-coordinate (up-and-down
position). Change the name of the scrollbar to ZOOM; it’s more
descriptive.
 When you
click on a control, it runs the commands in the
When you
click on a control, it runs the commands in the RUN property as if you
had typed them in the Listener. Here are all the command
lists:
[RT 45] [BK 50] [FD 50] [LT 45] [HOME CLEAN]
[SETVELOCITY 0 PPROP "ZOOM "VALUE 0]
[SETVELOCITY GPROP "ZOOM "VALUE]
Put the commands in the proper control. The square brackets
are already there for you. (The static text box doesn’t need a command
list.)
Computing with Numbers
Logo works with numbers in many ways, from simple values to advanced mathematical calculations. Don’t worry, we’ll keep it simple here, but if you want to learn more about logarithms or trigonometry, check out the online Help files to see what else Logo can do.
Have you noticed that every instruction you want Logo to run always
starts out with the command which is followed by its inputs? You can do
arithmetic that way in Logo - type + 2 8 in the Listener and Logo will
display the result of 10 - but that’s not how people like to do
arithmetic. So Logo has bent its own rules and made the arithmetic
operators work in a special way called infix (meaning the operator goes
in between the inputs the way people like to see them). Type 2 + 8 in
the Listener and Logo will display the same result as before. Logo uses
the symbols + and - for doing addition and subtraction just like people
do. However, multiplication is done with the * symbol and division is
done with the / symbol. For example, you could move the turtle forward
30 steps with any one of these commands
FD 10 + 10 + 10
FD 50 - 20
FD 15 * 2
FD 90 / 3
You don’t need the space between the symbol and the numbers to do
calculations, but it’s easier to read. However, to make a negative
number, you must not have a space after the - symbol. Try FD -30.
Computing with Words and Lists
Words and lists are two of the fundamental data types in Logo. We’ve
used words for names of colors (“ORANGE), objects (“TURTLE), files
(“SAILBOAT), and even as a simple message (“HELLO). We’ve used a
list of commands for REPEAT, a list of
numbers for SETPC, and a list of property
pairs for PPROPS where the list
contained another list as an element. A list which contains other lists
as elements is called a compound list but just think of it as a list.
A list of words is a sentence – not just for you, but for Logo as well. A sentence is still a list but it can not have another list as an element – just words. If you don’t like computing with numbers (or math) you may find that exploring with words and lists is just the thing for you – areas like poetry, silly sentences, foreign language translation, and linguistics are some examples.
Words and lists are everywhere in Logo. There are many commands and operations that work with both, depending on the input you give. Here are examples of some of the most common operations. Fortunately, with many Logo instructions, you can tell what they’re for just by their name. Check out the Help files for more information. Try using your own name.
| Examples with words | Examples with lists |
|---|---|
| FIRST “COMPUTER Result: C LAST “COMPUTER Result: R BUTFIRST “COMPUTER Result: OMPUTER BUTLAST “COMPUTER Result: COMPUTE MEMBER? “P “COMPUTER Result: TRUE BUTMEMBER “P “COMPUTER Result: COMUTER EMPTY? “COMPUTER Result: FALSE WORD “COM “PUTER Result: COMPUTER WORD? “COMPUTER Result: TRUE |
FIRST [TERRAPIN LOGO] Result: TERRAPIN LAST [TERRAPIN LOGO] Result: LOGO BF [TERRAPIN LOGO] Result: [LOGO] BL [TERRAPIN LOGO] Result: [TERRAPIN] MEMBER? “LOGO [TERRAPIN LOGO] Result: TRUE BM “LOGO [TERRAPIN LOGO] Result: [TERRAPIN] EMPTY? [TERRAPIN LOGO] Result: FALSE LIST “TERRAPIN “LOGO Result: [TERRAPIN LOGO] LIST? [TERRAPIN LOGO] Result: TRUE |
Operations (Your OUTPUT matters too!)
An operation is a command that outputs a value that can be used as input
to another command. Operations are also called reporters because they
report (or output) a value. The procedures we’ve written so far do their
job and then just stop - we didn’t need an output from them. Wouldn’t it
be silly if SQUARE output the message “I’m done now” every time it
drew a square? You can ignore unwanted outputs by using the IGNORE
command; it takes any input and throws it away. To make your own
operation, use the OUTPUT command in your
procedure. It takes one input - the value you want reported (or output).
When the OUTPUT command is run, your
procedure stops and the value of the input to
OUTPUT is output for input to something else.
So, make sure your procedure has done all its work before the
OUTPUT command is run. Ever heard “garbage
in, garbage out?” Don’t do that.
There is not a built-in operation called SECOND but we can make one.
SECOND will report the second element of a word or a list in the same
way that FIRST reports the first element. Define SECOND and then try
some examples using words and some using lists.
TO SECOND :INPUT
    OUTPUT FIRST BUTFIRST :INPUT
END
How about making THIRD your second operation since SECOND was your
first? You could use your first operation inside your second because the
third element is the SECOND of a
BUTFIRST! 4ths anyone? I’ll take the
fifth.
Decisions
Big decisions are made with one little word - IF. So far, our procedures have just run commands in the order in which we wrote them. It’s like we were saying “Do what I say!” to our procedure and it did it, no questions asked. Programs that make decisions have a sense of intelligence about them - they seem to be smart enough to do the right thing at the right time for the right reason (usually!). It’s like the program is saying “I can make my own decisions!” One way that decisions are made in Logo is with the IF instruction which is usually put on a line by itself. A simple form of IF is: IF predicate THEN instruction
A predicate is an expression that evaluates to either the word TRUE or
the word FALSE. The instruction after THEN is only run when the
predicate evaluates to TRUE. It should not be a surprise that most of
the predicates in Logo have a question mark at the end of their name
since a question can determine if something is TRUE or FALSE. Some
of the most commonly used comparison operators are another exception to
the “command first” rule and allow you to put them in between the two
inputs you want compared. For example, the equal sign ( = ) compares two
inputs and reports TRUE if they are equal and FALSE if they are not
equal. Both of these examples do the same thing.
IF :SIZE = 10 THEN STOP
IF = :SIZE 10 THEN STOP
Most people like the first example better - another infix choice.
Recursion
With one small decision (and a minor calculation), a simple procedure
can become a masterpiece of design. Without that little decision, things
can get out of control and cause an ‘infinite loop’ - a technical term
for a program that will not stop on its own. Of course, sometimes the
infinite loop is actually a plan, usually for a demonstration of some
kind. Look back at SHIFT.EYES and you’ll see that the last line causes
SHIFT.EYES to run again. Each time SHIFT.EYES runs, it runs itself
again and again and again and again … you get the idea.
A procedure that runs itself is said to be recursive - the running of the procedure recurs (or repeats) over and over again. Isn’t this just an infinite loop? It could be, but we are going to control it. How? First, we will have a formal input that we can modify each time the procedure runs itself - something must change each time. And, we must define a way for stopping the procedure from running itself - a condition must be met. All of this may sound really complicated (and it is) but with an example procedure, most of it will be clear as … glass.
Here is a simple procedure that draws a line of length SIZE and then
turns right 90 degrees.
TO LINE :SIZE
    FD :SIZE RT 90
END
It’s not very impressive, but suppose we change it so that after a line
is drawn of length SIZE, it runs LINE again but with a slightly
bigger SIZE? Define LINE and run it. Yes, it is an infinite loop,
but this is just a demo. Press the Stop button to stop it.
TO LINE :SIZE
    FD :SIZE RT 90
    LINE :SIZE + 5
END
So, now we have a formal input and we modify it each time but, we still
need a way to stop LINE from running itself. Since SIZE is growing
bigger and bigger, how about checking it each time and then, when it
gets greater than 100, we just stop?
What we need is an IF instruction. If SIZE is
greater than 100 then stop. An instruction that makes the decision to
stop a recursive procedure is called a stop rule. Where does it go?
Certainly, it has to be before LINE is run again, but should it be
before a line is even drawn by FORWARD?
You can try it both ways and see what the difference is. Try different
inputs.
TO LINE :SIZE
    FD :SIZE RT 90
    IF :SIZE > 100 THEN STOP
    LINE :SIZE + 5
END
Add a second input called ANGLE so that you can make the turn anything
you want.
Add a third input called INCREMENT and use it to change SIZE instead
of 5.
There is a lot more to learn about recursion to fully understand it. This is just the beginning. Imagine!
Variables (MAKE some THING)
The only variables we used so far were the formal inputs to procedures. You can create your own variables in the Logo workspace. To see them, type PONS (short for PRINTOUT NAMES). The workspace is also referred to as the “global environment” because variables created there are accessible by procedures as well as you. The formal inputs to procedures only exist while the procedure is running. These variables are created in the “local environment” of the procedure. You can’t get at them while the procedure is running and they go away when the procedure ends. When writing programs, it’s important to know where variables are created.
Every variable has a name. A name is a word. To use a word as itself,
put a double quotation mark in front of it so that Logo won’t think it’s
a command and try to run it. Every variable has a value associated with
it, even if it’s the empty word or the empty list which look like
nothing. To create a variable in the workspace, give
MAKE the name of the variable and the
value you want to assign to it. To use the value of a variable, give the
name of the variable to THING. The
following examples create one variable named STEPS with a value of 20
and another variable named INCREMENT with a value of 10.
MAKE "STEPS 20
MAKE "INCREMENT 10
THING is an operation that reports (or outputs) the value associated with the variable whose name you give it as input.
THING can be used wherever you need a value.
FD THING "STEPS
would move the turtle 20 turtle steps. The output of
THING is 20 which is used as the input to
FORWARD. You can change the value of a
variable by using another MAKE command
with a new value. The value can be just a number, a calculation, the
output of an operation, or any Logo data value. It’s usually a good idea
to assign the same type of data to the same variable. For example, since
I used STEPS for numbers, I shouldn’t put “LIVELY in it later on.
That just invites trouble and could be very frustrating. Most other
programming languages force you to use the same type of data again but
it’s not a restriction in Logo. Restriction or not - it’s a good idea.
In the following example, you can see that the use of THING can get pretty messy and awkward. Just imagine trying to add four or five values together!
MAKE "STEPS THING "STEPS + THING "INCREMENT
Don’t worry. Help is on the way! Are you familiar with emoticons
(emotion icons) - things like :) for happy and :( for sad? If you treat
this page like a turtle and ‘run’ a RIGHT 90, you’ll see a smile and a
frown. The colon character looks like a pair of eyes. That’s exactly
what the Logo shortcut is - a colon in front of a variable name acts
like a pair of eyes that lets you ‘see’ what the value of the variable
is. Of course, by ‘see’ I mean it outputs the value.
Dots: A THING, I See!
The colon is called ‘dots’ in Logo. Dots takes the place of both THING and the double quotation mark in front of the variable name. It saves a ton of typing! The example from above can be written much more simply now.
MAKE "STEPS :STEPS + :INCREMENT
When you read instruction lines or say them out loud, it’s a good idea to say the word ‘dots’ for the colon and ‘quote’ for the double quotation mark. So, this line would be said as “Make quote-STEPS dots-STEPS plus dots-INCREMENT.” Without even seeing the line, another Logo person would know that quote-STEPS meant the variable name and that dots-STEPS and dots-INCREMENT meant the values. You’ll find this to be a big help while learning and a good habit to stick with.
Terrapin Logo lets you get away with not using the dots by setting the
“Relaxed syntax” option in the Operation dialog of the Preferences
menu. It’s been handy, hasn’t it? But suppose you wanted to create a
procedure to draw rectangles that uses inputs called HEIGHT and
WIDTH. Since WIDTH is a built-in Logo
procedure, your rectangles will not work. Take off the “Relaxed syntax”
option and try it. You could fix it with FD THING “WIDTH but “dots” is
simpler.
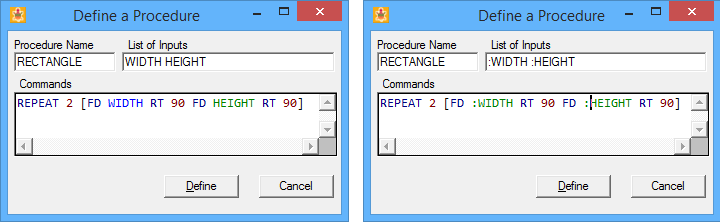
Note how Logo changes the color of the word WIDTH. In the left panel,
WIDTH is blue. If the word is a
Logo procedure, its color is blue. In the right panel,
:WIDTH changed to green,
indicating that Logo thinks the word is a name rather than a procedure.
Logo Programming
All of the exploring and playing around we’ve done is a part of learning to write programs in Logo. After all, to do any job well, you have to learn what tools are available and how to use them. Logo is much more than turtle graphics, pictures and sounds. It’s a powerful language for problem solving, calculating with numbers, manipulating words and lists, and learning concepts of computer science and programming.
A program can be as simple as one procedure like MY.GRID. It has a
definite purpose or goal - in this case, to make a small graph for
designing turtle shapes. It uses the tools of the language and puts them
together in a sequence of instructions to get the job done. A person
running MY.GRID doesn’t need to know how a graph is made, only
that MY.GRID will make a graph every time it’s run. But you, as the
programmer, need to know all the gritty details that make it work
correctly. It’s a challenge at times, but also interesting, intriguing,
fascinating and sometimes frustrating, but always rewarding when your
program works properly.
A big program shouldn’t be just one huge procedure trying to do it all. You may need a lot of little procedures to do a big project, with each procedure doing just a little bit of a big job. You’ll find that many of your small procedures will be useful in other projects. Save them in their own file so you can include them in other projects without defining them again. You can build your own library of special procedures, use them when you need them, and share them with other Logo programmers. There is so much more to Logo programming - I hope you explore!