Part Three
Printing and Saving
Saving your Graphics
 Did you create a design you want
to keep? I hope so. You can print the Graphics window from Logo or you
can save it in a file and use it like any other image file - print it,
add it to a word processing file, send it to someone through electronic
mail or post it on a bulletin board or refrigerator. To print the
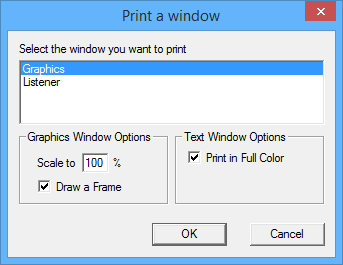
Graphics window in Logo, select Print from the File menu or press
the Print button in the Tool bar. In the “Print a Window” dialog box,
select Graphics and then click the OK button. You can print the Listener
window if you want a record of your typing.
Did you create a design you want
to keep? I hope so. You can print the Graphics window from Logo or you
can save it in a file and use it like any other image file - print it,
add it to a word processing file, send it to someone through electronic
mail or post it on a bulletin board or refrigerator. To print the
Graphics window in Logo, select Print from the File menu or press
the Print button in the Tool bar. In the “Print a Window” dialog box,
select Graphics and then click the OK button. You can print the Listener
window if you want a record of your typing.
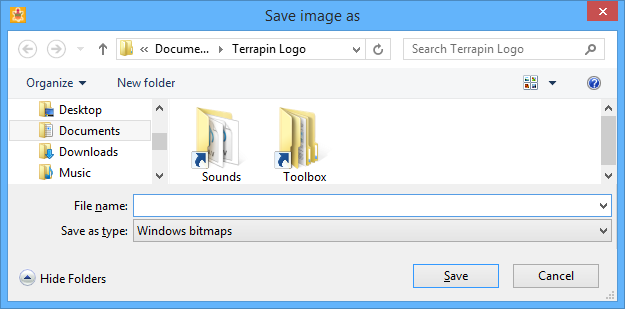
To
save the Graphics window to a file, select Save As…⇒Image from the
File menu. In the “Save image as” dialog, enter a name for your
design and then press the Save button. Select a different folder or type
of image format if you need to.
Saving Your Workspace
The first time you started Logo, there was no SQUARE command. After
all the work you’ve done, you wouldn’t want to lose it and have to start
all over again, would you? If you save your workspace before quitting
Logo, then the next time you start Logo, you can load it back and be
right back where you were.
What’s the workspace in
Logo? It’s simply that part of Logo that contains your procedures.
(There is really a bit more to it but don’t worry about that for now.)
Why save the workspace? Organization! You can have many workspace files, one for each project. When you work on a project about one thing, you don’t want your workspace cluttered up with procedures from something else. Your workspace could get pretty messy.
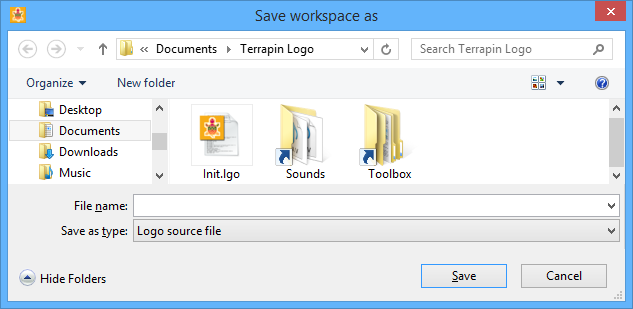
To save your workspace, click on the Save button in the Toolbar or select Save⇒Workspace from the File menu. Enter a file name that will help you remember something about the project and click the Save button.
Printing Your Procedures
What procedures do you have in your workspace? If you want to find out, you can type POTS to find out. (POTS is short for POT PROCEDURES). This will display the title line of each of your procedures in the Listener window. The title line shows the procedure name as well as the names of any inputs required. Sometimes, this is all you really want to know about your procedures - it’s a quick way to find out what’s in your workspace or to find out how many inputs a particular procedure needs, if you forgot.
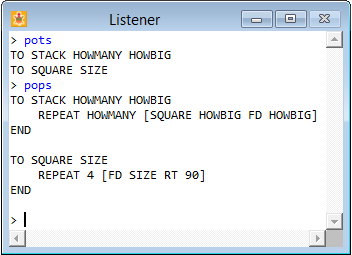 If you want to see all of your procedures as
well as all of the instructions that are in them, type
POPS (short for
PRINTOUT
PROCEDURES). This will display all of
the lines of all of your procedures in the Listener window. Each
instruction line is indented to make it easier to read. The last line of
each procedure is the word
If you want to see all of your procedures as
well as all of the instructions that are in them, type
POPS (short for
PRINTOUT
PROCEDURES). This will display all of
the lines of all of your procedures in the Listener window. Each
instruction line is indented to make it easier to read. The last line of
each procedure is the word END all by itself. Don’t worry about that
for now - just remember, every TO must have an
END.
How do you get a real printout on a real
printer (you know, paper)? First, display what you want printed in the
Listener window and then click on the Print button in the Toolbar,
select the Listener window and press OK. To maximize the Listener
window, type TS (short for
TEXTSCREEN). To return to ‘Standard
Window Layout,’ type SS (short for
SPLITSCREEN).
Loading Files
Loading files is the opposite of saving them. When you want to see your favorite drawing again or use the same procedures you saved in your workspace, you have to load them back into Logo.

Loading the Graphics window
To load an image file to the Graphics window, select Load⇒ Background Image from the File menu. Logo displays the Load image dialog box with a list of file names. Select the file you want loaded and press the Open button. The image is loaded to the Graphics window and replaces what’s there now.
Loading a workspace file
To load a workspace file, select Load⇒Into Workspace from the File
menu. Logo displays the Open dialog box with a list of file names.
Select the file you want loaded and press the Open button. The contents
of the file are added to the current workspace. This is a handy way to
combine procedures from one project into another project. For example,
if you saved just STACKS and SQUARE in a workspace file, you could
add them to your current workspace at any time without redefining them.
Music! Music! Music!
Whether or not you can play a musical instrument, you can have a lot of fun adding music to your Logo procedures. The PLAY command is used for music as well as sounds (we’ll get to those later). To play your own musical score, you have to give the PLAY command a list of special musical commands. These include the notes to play (A, B, C, D, E, F and G), modifiers (# for sharps, b for flats), length, volume, octave and even the instrument. There is a lot you can do to control your music. Check out the online Help under PLAY to learn more.
Type in the PLAY commands below and see if you can name the tunes. (Be sure to type in the period after some notes; it’s another modifier.)
PLAY [I9 L4 E D C D E E E]
PLAY [I57 L2 C C L4 C D E. E D E F G.]
Look in the Logo Library in Help for examples of musical programs that include Beethoven, Bach and a piano to play your own music. (Beethoven’s “Für Elise”, J.S. Bach’s Partita in E, The On-Screen Piano)
The Color Picker
 The Color Picker is a special tool for
selecting a color. Click on the Color Picker button in the Tool bar to
display the Color Picker window. When you click and drag around in the
upper area of the Color Picker, the mouse pointer changes to an
eyedropper shape. As long as you hold down the mouse button and drag the
eyedropper around the upper area, the lower area of the Color Picker
shows the color being picked up by the eyedropper. When you have
selected the color you want, just release the mouse button.
The Color Picker is a special tool for
selecting a color. Click on the Color Picker button in the Tool bar to
display the Color Picker window. When you click and drag around in the
upper area of the Color Picker, the mouse pointer changes to an
eyedropper shape. As long as you hold down the mouse button and drag the
eyedropper around the upper area, the lower area of the Color Picker
shows the color being picked up by the eyedropper. When you have
selected the color you want, just release the mouse button.
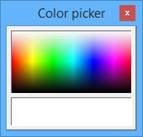 To use the selected color,
click and drag from the lower area of the Color Picker. As you drag the
color around to places that can change color, the mouse pointer changes
to a paint bucket with paint pouring out and a frame appears around the
area to be colored. Release the mouse button to drop the
color.
To use the selected color,
click and drag from the lower area of the Color Picker. As you drag the
color around to places that can change color, the mouse pointer changes
to a paint bucket with paint pouring out and a frame appears around the
area to be colored. Release the mouse button to drop the
color.
What can you color with the Color Picker?
Try dragging the paint bucket around and you’ll see. Drag it over a
turtle to change the pen color. Drag it over the Graphics window to
change the background color.
Logo can have over 16
million colors! To use them in a procedure, give the
SETPC or SETBG
command a list of three numbers, each in the range of 0 to 255. The
numbers represent the amount of red, green and blue in the color. Try
SETPC [155 6 160] or SETBG [246 148 134].
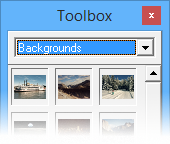
The Toolbox

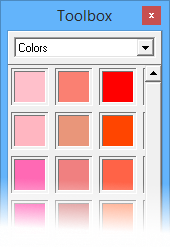 The
Toolbox window contains many resources you can use in your Logo projects
such as controls, shapes, backgrounds and colors. To display the
Toolbox, click on the Toolbox button in the Tool bar. The popup list at
the top of the Toolbox lets you select any of the panels. For right now,
select the Colors panel. To use a color, just drag it from the panel to
the background or a turtle.
The
Toolbox window contains many resources you can use in your Logo projects
such as controls, shapes, backgrounds and colors. To display the
Toolbox, click on the Toolbox button in the Tool bar. The popup list at
the top of the Toolbox lets you select any of the panels. For right now,
select the Colors panel. To use a color, just drag it from the panel to
the background or a turtle.
The Colors panel shows
the 138 extended colors arranged in groups by shades of intensity (from
light to dark). You can see each color’s name and index number by
putting the mouse pointer over a block. (If you don’t see the name,
select Show Hints in the Help menu.) A list of these 138 color words is
maintained by the COLORS command; type
SHOW COLORS in the
Listener window to see the list of color words in alphabetical
order.
The color words can be used in
SETPC and SETBG.
Put a double quotation mark in front of the color word. Try SETBG
“ORANGE. If you can’t decide on a color yourself, try SETPC PICK
COLORS.
Turtle Shapes
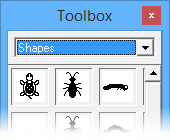 The turtle doesn’t have to look
like a turtle all the time. It can pretend to be a moose, a bug, a
sailboat, a number or a letter of the alphabet. Open the Toolbox, select
the Shapes panel and then drag the sailboat shape to the turtle and drop
it. Type
The turtle doesn’t have to look
like a turtle all the time. It can pretend to be a moose, a bug, a
sailboat, a number or a letter of the alphabet. Open the Toolbox, select
the Shapes panel and then drag the sailboat shape to the turtle and drop
it. Type RT 90 and see what happens. The new turtle shape rotates just
like the original turtle shape, but sometimes you don’t want that to
happen. Type LT 90 to fix the sailboat and then type
LOCKSHAPE. This stops the rotation of
the shape but the turtle will still move in the direction you want. Type
RT 90 to see that the sailboat stays upright. To allow the shape to
rotate again, type
UNLOCKSHAPE.
 The turtle can leave a trail
of its shape as well as draw lines. Just type
STAMP - you won’t notice the stamped image
until you move the turtle to a different place. You can even drag the
turtle around with the mouse. Here’s a quick ‘target’ game to
try.
The turtle can leave a trail
of its shape as well as draw lines. Just type
STAMP - you won’t notice the stamped image
until you move the turtle to a different place. You can even drag the
turtle around with the mouse. Here’s a quick ‘target’ game to
try.
From the Toolbox Backgrounds panel, drag the
Earth image to the Graphics window. Drag the turtle to any spot on the
moon’s surface and, using one RT or LT and one FD, try to get the
turtle back home to Earth. If you miss, type
STAMP to mark your spot and try again. Then
try getting home with a BK command!
Lots of Turtles
Terrapin Logo lets you have lots of turtles all at the same time! In fact, up to a hundred turtles are possible, but let’s not get carried away just yet.
Things can get a bit confusing with a large crowd of turtles. Who’s listening to your commands? Will they do what you ask? Is each on its own? Do they work in groups? The answers are: “WHO is,” “Yes,” “Sometimes,” and “They can.”
So, who is listening right now? Type WHO and find out. WHO reports (outputs) either a number, a list of numbers, a list with one name, or a list with a lot of names. In any case, the output of WHO lets you know which turtles are active. (Don’t worry about turtle names just yet.)
When Logo starts, there are actually 16 turtles available (or defined) but only turtle number 0 is active (listening and responding to your commands). The other 15 turtles are actually sitting at home, hidden from view, just waiting for you to ask them to do something. Any available turtle will respond to commands if you ask it to.
 The ASK command gives one or more turtles a list
of commands to run. Type
The ASK command gives one or more turtles a list
of commands to run. Type ASK 1 [ST FD 50] and then ASK [2 3 4] [ST
RT 45 FD 50]. Now type WHO and you’ll see
that turtle 0 is still the only active turtle even though turtles 1, 2,
3 and 4 ran some commands. Turtles 2, 3 and 4 are standing on top of
each other. Drag them around to different locations and do the ASK
commands again. If you don’t use ASK, then
just turtle 0 will respond because it’s still the only active turtle.
You can tell turtles to become active in a number of different ways.
TELL number - activates the one turtle
number
TELL list - activates
the turtle numbers in the list
TELLODD - activates all odd-numbered
turtles
TELLEVEN - activates
all even-numbered turtles
TELLALL n1 n2 - activates the range
of turtles
 To make all 16 turtles active, type
TELLALL 0 15. Type WHO and you’ll see a
list of 16 numbers. Now type FD 50 RT 90 FD 25. All of the active
turtles run your commands at the same time. You can still use
ASK to run commands for just one or a few
turtles.
You can make the active turtles take turns
running commands with the EACH command. It
needs a list of commands as input. While these commands are running,
WHO reports each turtle’s number in turn
rather than all of the active turtles. It’s a convenient way to modify
the instructions so that each turtle does something slightly different.
Try the following commands and then do some on your own.
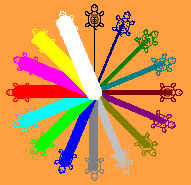
TO COLORWHEEL
    CS SETBG "ORANGE
    TELLALL 0 15 ST
    EACH [RT WHO * 360 / 16]
    EACH [SETW WHO + 1 SETPC WHO]
    FD 100
END
Watch out! WHO may not be a number!
Lots More About Lots of Turtles
Turtles have names as well as numbers. Sometimes it’s better to use a
name and sometimes it’s better to use a number. It all depends on what
you’re doing in your project. So, how can you control what’s in
WHO? With TELL,
of course. If you use numbers in the TELL
command, then WHO reports numbers; if you use
names in TELL, then
WHO reports names. To see a list of turtle
names, type TNAMES (short for
TURTLENAMES). To see a list of
numbers, type ALLTURTLES.
There are three ways to create turtles. The
SETTURTLES command creates a lot of
turtles all at once. If there are already turtles available, they are
erased before the new ones are created.
SETTURTLES assigns names like
TURTLE.n, where n is the turtle’s number. The
NEW command creates one additional turtle
with a name like TURTLE.n. The DECLARE
command creates one additional turtle but requires that you give the
turtle a name yourself.
SETTURTLES number - creates a lot of
turtles at once
NEW “TURTLE -
creates one new turtle as TURTLE.n
DECLARE “TURTLE “name - creates one
new turtle
You can change turtle names with SETTNAME (short for
SETTURTLENAME). It needs two inputs
- the turtle number or current name and the new name. For example,
SETTNAME 1 “TOUCHEorSETTNAME “TURTLE.1 “TOUCHEboth do the same thing.
Ready for a couple of small projects?
Multi-Turtle Projects
Make Graph Paper
 Did you know that the turtle’s screen is like a
huge sheet of graph paper? That’s what the
SETX and SETY
commands use to move the turtle around. The turtle’s shape is like a
small sheet of graph paper only 31 by 31 dots. The
Did you know that the turtle’s screen is like a
huge sheet of graph paper? That’s what the
SETX and SETY
commands use to move the turtle around. The turtle’s shape is like a
small sheet of graph paper only 31 by 31 dots. The MY.GRID procedure
creates graph paper for making your own turtle shapes. If you use the
procedure name GRID (which is the most likely name to use), you will
see an error, because GRID is already
present as a built- in procedure - you cannot redefine built-in
procedures.
TO MY.GRID
    CS SETTURTLES 32
    TELL ALLTURTLES PU ST SETX -124
    EACH [SETY 124 - WHO * 8]
    RT 90 PD FD 248 PU LT 90
    EACH [SETX LAST GETXY SETY -124]
    PD FD 248 PU HOME
END
I Saw Three Ships
 You could add music or an ocean background. Create
a whole fleet of ships. Give each ship the name of a famous explorer.
You could add music or an ocean background. Create
a whole fleet of ships. Give each ship the name of a famous explorer.
TO REGATTA
    TELLALL 0 2 PU ST
    EACH [FD WHO * 40]
    LOCKSHAPE SETSHAPE "SAILBOAT
    RT 90
    EACH [SETPC PICK BM "WHITE COLORS]
    EACH [SETVELOCITY RANDOM 40]
END
Animation
Did you sail the ships? Setting a turtle in motion with SETVELOCITY is an exciting form of animation. Once the turtle’s velocity is greater than zero, the turtle starts moving in the direction it’s heading and keeps moving without any more help from you. Look up HEADING in the online Help.
The input to SETVELOCITY is the number of turtle steps per second that you want the turtle to move. A small number moves the turtle slowly; a large number moves the turtle very fast. Remember, it’s the number of turtle steps per second forever, until you stop it.
What about FORWARD and
BACK? They move the turtle too, but normally
it’s so fast you can’t even see it! You can adjust the speed at which
the turtle moves in response to these commands, too. Use SETSPEED with
a number from 0.1 (very slow) to 1 (normal). Each turtle can have a
different speed setting. Try drawing squares with fast and slow turtles.
Animation is more than just movement. It’s also changing the shape of something to give it the appearance of some action, like walking or flapping or winking. If you create a sequence of two or more shapes that are slightly different from each other and then quickly change the turtle’s shape over and over again, you can create the illusion of a live turtle. Use the WAIT command to control the timing of the changes. The input to WAIT is the number of thousandths of a second for Logo to wait before it runs the next instruction. The Turtle Shape Editor is a tool for helping you make your own shapes. Want to do that right now?
For the Adventurous (That’s you!)
 This project is actually not that hard to do. I’m not
explaining everything here, but there’s nothing you can’t handle. Give
it a try. Explore!
This project is actually not that hard to do. I’m not
explaining everything here, but there’s nothing you can’t handle. Give
it a try. Explore!
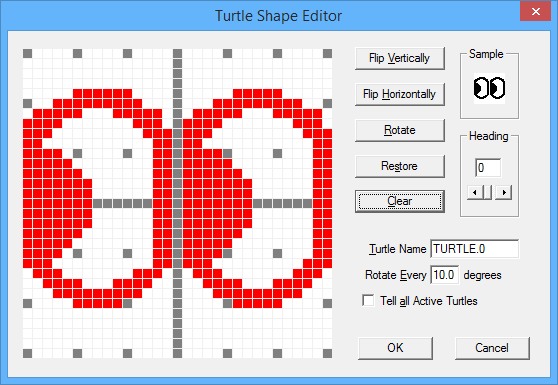
Restart Logo so you have a clean workspace. Bring up the Turtle Shape
Editor by clicking its button in the Tool bar. Click Clear. Make a
pair of eyes that look to your left. Click OK. Type (SAVESHAPE) -
yes, with the parentheses. Save this file in the Shapes folder in the
Toolbox as EYESLEFT. Bring up the shape editor. Click Flip
Horizontally. Click OK. Type (SAVESHAPE). Save this file as
EYESRIGHT.
Enter each procedure in the editor. The
REPEAT in LOOKAROUND is really one long
line. Type carefully.
TO SHIFTY.EYES
    DECLARE "TURTLE "SHIFTY
    ASK "SHIFTY [PU LOCKSHAPE]
    IGNORE LAUNCH [SHIFT.EYES]
END

TO SHIFT.EYES
    ASK "SHIFTY [LOOKAROUND MOVE]
    SHIFT.EYES
END

TO LOOKAROUND
    REPEAT 4 [
        SETSHAPE "EYESRIGHT WAIT 200
        SETSHAPE "EYESLEFT WAIT 200
    ]
END

TO MOVE
    RT RANDOM 360 FD RANDOM 300
    SETTSIZE PICK [0.5 1 1.5]
END
Type SAVE “SHIFTY to save your workspace.
Type SHIFTY.EYES to run it.
You can type other commands while the eyes are watching.