Chapter 0: Getting Started
Welcome to Terrapin Logo. There’s a lot to learn, but don’t panic - take your time, go at your own pace, try things out, ask questions. Boldly go where many have gone before - the fascinating worlds of imagination, exploration and new discoveries. It’s a never-ending journey that can take you into many different areas of investigation. We’ll make a start of it with lessons and projects that cover some of the basic Logo concepts. By the time we’re done, you’ll have a solid foundation on which to continue exploring with Logo. It could take you into higher-level mathematics, graphic design, animation, language arts, linguistics, music theory, artificial intelligence, game design, robotics, or something completely different. Even if you go no further than this tutorial, try to have fun exploring, playing and tinkering with Terrapin Logo. It’s an environment for learning, but what you learn and where you go from here is up to you. This manual is really just the beginning.
Why Chapter 0?
Working with computers, you will often find that sequences of things begin with 0 rather than with 1. You may not like it, but you may as well get used to it because you’ll see it later on when we start playing around with turtles, colors and controls. Sometimes it’s a handy convenience and other times it just makes you wonder. Of course, since computers work in binary, 0 is half of what they know! Not everything starts with 0, so don’t be too bothered by it - just accept it as one of those things that computers do. You may even appreciate it after working your way through “Loopy Math” later on.
Installing Logo
 Installing software is really just a matter
of getting it copied to your system’s hard drive in the proper place and
format so that you can find it and your system can run it. Whether you
are working on a Macintosh computer or a PC, the installation process is
the same. Just follow these simple steps:
Installing software is really just a matter
of getting it copied to your system’s hard drive in the proper place and
format so that you can find it and your system can run it. Whether you
are working on a Macintosh computer or a PC, the installation process is
the same. Just follow these simple steps:
- Exit from any applications you currently have running before you begin installing any new software. This will make sure that the installation program has enough memory and other system resources to do its job properly.
- Carefully remove the Terrapin Logo CD from its protective case and insert it into your computer’s CD drive and then wait for a few seconds. The installation program should start automatically, but if it does not, then select it yourself and run it. It’s called SETUP under Windows, and Install on Mac OS.
- Respond to the dialogs in a manner that allows the installation process to continue, otherwise Terrapin Logo will not be installed on your computer.
- Carefully remove the CD, return it to its protective case, and store it in a safe place. You will not need it again unless you have to go through the installation again for some reason.
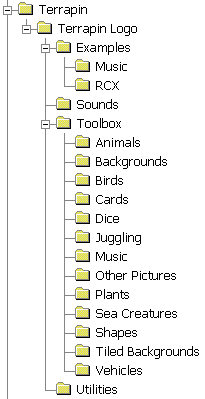
The installation process creates a lot of folders on your computer. As you can see from the illustration, there are folders within folders within folders. It may seem a little messy at first, but there is method to all this madness - organization! You’ll find this to be a big help when you need to find a tune to play (in Music) or a noise to make (in Sounds) or a view of the earth from the moon (in Backgrounds).
It’s also important to know where to put things because items in one folder are treated differently than items in another folder. For example, the files in Backgrounds are used to fill the graphics screen while the files in Shapes are used to change the shape of the turtle. The folder names under Toolbox appear as separate panels in the Toolbox window, which you’ll see later. You can create your own folders in the Toolbox; this gives you quick access to your own graphics while working in Logo.
Feel free to browse through the folders to see what files are there. Just don’t delete anything! Some folders have a lot of files; some have just a few. As time goes on, you’ll probably add some files of your own. Try to keep things organized like it is now; it will be a big help later on.
Starting Logo
![]() On the Macintosh, double-click the Terrapin
Logo program icon. On the PC, click Start, Programs, Terrapin Logo and
then Terrapin Logo again. (Of course, you can set up programs any way
you like on your own computer, so these instructions may be different
for you.) The first time you start Terrapin Logo, there is a short delay
while some work files are being built to complete the installation and
setup; it will start up faster thereafter.
On the Macintosh, double-click the Terrapin
Logo program icon. On the PC, click Start, Programs, Terrapin Logo and
then Terrapin Logo again. (Of course, you can set up programs any way
you like on your own computer, so these instructions may be different
for you.) The first time you start Terrapin Logo, there is a short delay
while some work files are being built to complete the installation and
setup; it will start up faster thereafter.
The Logo Environment
The first time you start Terrapin Logo, the windows are arranged in what is called Standard Window Layout. The large Graphics window is where the turtle moves around and draws. It’s also where you put background images, other pictures, buttons, sliders and other controls for your projects. The Listener window is where you type commands or instructions for Logo to do. Often the results will affect the Graphics window, but sometimes you’ll see a response in the Listener.
The row of buttons above the Graphics window is called the button bar. If you move the mouse pointer over a button (without clicking), you should see a message pop up telling you what the button is for. If you don’t see the message, then click on Help in the menu bar and select Show Hints. If you want to turn them off later, just select Show Hints again.
![]()
Logo Help
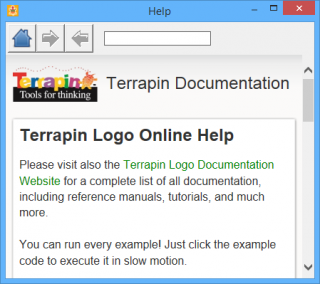 On-line Help is available whenever you use
Logo. Logo help includes definitions and examples of all Logo commands
and information about specific Logo topics. You can use Logo Help
whenever you have a question about Logo programming. Examples in Logo
Help execute in slow motion if you click them. You can access Logo Help
in a number of ways: the Help button
On-line Help is available whenever you use
Logo. Logo help includes definitions and examples of all Logo commands
and information about specific Logo topics. You can use Logo Help
whenever you have a question about Logo programming. Examples in Logo
Help execute in slow motion if you click them. You can access Logo Help
in a number of ways: the Help button  , the Help
menu, or the HELP command. On the PC,
pressing F1 will bring up a dialog box for help.
, the Help
menu, or the HELP command. On the PC,
pressing F1 will bring up a dialog box for help.
The Help panel has three buttons to navigate to the main page, or back
and forth between pages. You can enter the name of a command in the
Search field, and Logo looks up that command for you. You can also type
in any phrase, and Logo will browse all on-line documentation for this
phrase. If you, for example, enter the phrase “saving”, Logo displays a
list of all pages containing the word “saving”.
On-line Help is only available when your computer is connected to the Internet. That’s why it is called On-line Help.
Entering Instructions
Canyoutellwhatthissays? Can you tell what this says? Putting a space between the words of a sentence makes a big difference. The same is true for Logo. When you enter instructions into the Listener window, make sure you put a space between the words. Press the Enter key to tell Logo to run the instruction.
 Make sure the Listener window is the currently
active window (the one with the highlighted title bar). To make the
Listener window current, just click in it with the mouse, but watch
where the vertical insertion bar (or cursor) appears because that’s
where your typing will be entered.
Make sure the Listener window is the currently
active window (the one with the highlighted title bar). To make the
Listener window current, just click in it with the mouse, but watch
where the vertical insertion bar (or cursor) appears because that’s
where your typing will be entered.
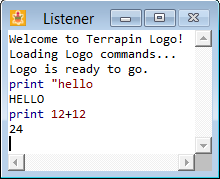
The illustration
above shows some examples that you should try yourself. You can see that
instructions can be entered in either uppercase or lowercase; Logo uses
uppercase for output but it’s not fussy about your input. Pay careful
attention as you type the letters and you will see the colors change.
This is called syntax highlighting and it’s much more than just
colorful. It can help you avoid errors. If you want to turn it off, it’s
in Preferences under the Edit menu. You may find you like it if you work
with it a while. Many of the Logo commands have an abbreviation that
means the same thing. The Pr in the third example is short for
PRINT. This saves typing time, but you’ll always
know what PRINT means.
Correcting Mistakes
Mistakes are going to happen, no matter how careful you are. Logo will quietly let you know there is a problem and then you can fix it easily. Use the up-arrow key to move the cursor onto the line with the error and then use the standard editing features of your system to make corrections. Use the Backspace key to erase characters to the left of (behind) the cursor; use the Delete key to erase characters in front of the cursor. You can select characters with the mouse or use the Shift key with the arrow keys. You can even cut-and-paste. Once you’ve made the correction, just press Enter again. Don’t worry about making mistakes in Logo. Sometimes, an interesting discovery is just a mistake away. The computer may do something unexpected or different from what you intended; the result may take you in a new direction. Not all mistakes are bad.
Where to Now?
It’s not absolutely necessary to go through this manual from the front to the back. However, there are some things you should know in the earlier parts before you can fully understand what follows. Feel free to explore.
If you’re in a hurry to see an example project, then follow these steps to play a sample game:
- Click on the File menu and select Load/into workspace
- Select ScatterGrams from the Open dialog window
- Click the Open button
If you’d rather play some music right away, then follow these steps:
- Click on the File menu and select Load/into workspace
- Double-click the Music folder
- Select Piano from the Open dialog window
- Click the Open button