Chapter 2: Teaching Logo Something New
Logo commands such as FORWARD and BACK are called primitive procedures. They are words that Logo already knows. Part of the power of Logo is that you can add new words to the language and then use them as if they were built-in. You might think that drawing a square is such a simple thing that Logo should already know how to do it. Type:
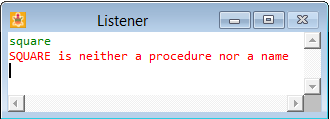
SQUARE is not in Logo’s vocabulary yet, but this chapter will get you
started in writing your own procedures, beginning with SQUARE.
What is a Procedure?
A procedure is a set of instructions that is given a name that describes it. It’s an abstraction from the low-level details that define how it works to a higher-level expression of the idea or concept of what it does when you run it.
Why Define a Procedure?
It’s much easier to type a one-word procedure name than to type all of
the instructions that would do the same thing. Would you rather type
SQUARE or REPEAT 4 [FORWARD 100 RIGHT 90] every time you want a
square? Procedures also help you to organize a large project into
smaller parts that work together to achieve a goal. Making changes is
easier, too. If you wanted to change the square to 50 turtle steps,
modifying the procedure definition is much easier than making changes to
each occurrence of the REPEAT instructions.
When to Define a Procedure?
Any time you find yourself typing the same sequence of commands over and over again, you should consider defining a procedure. It will not only save you typing time, but also help you to better understand what you are doing now and to more easily recall what you did later. Procedures are helpful when explaining your work to others, too. Defining a procedure is so simple that you’ll often do that before even typing out a long sequence of commands.
Naming a Procedure
A procedure name is one word that should describe what the procedure does so that you can easily remember what it’s for. A word in Logo can be just one character, but that’s not usually good for a procedure name
- you’re likely to forget what the procedure does. A word can also be
very long but that’s not good either - after all, part of the reason to
use procedures is to save typing. The procedure name should be simple
and related to the action performed, the design drawn, or something else
that helps you to remember it.
SQUAREis a much better name thanEQUILATERAL.RECTANGLE. (The.is just another character in Logo; it’s often used like this for names that would otherwise be hard to read.)
TO Defines a Procedure
The TO command is a special form of Logo instruction. While you’re typing at the keyboard, TO followed by a procedure name opens the Define a Procedure window. (Later on, you’ll see that TO defines procedures as they are loaded from a file into the Logo workspace.) Since you’re going to be the teacher now, think of the Define a Procedure window as a special chalkboard where you’ll write today’s lesson.
To teach Logo how to square, type:
TO SQUARE
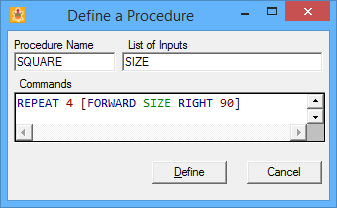
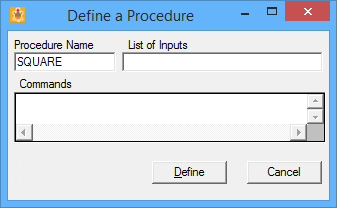 There are three text
boxes in the Define a Procedure window but we only need two of them
for now. The Procedure Name text box is automatically filled in with
the procedure name
There are three text
boxes in the Define a Procedure window but we only need two of them
for now. The Procedure Name text box is automatically filled in with
the procedure name SQUARE. Press the Tab key (or click with the mouse)
to move the cursor into the Commands text box. This is where you type
the instructions that make a square, just like you did in the Listener
window. Go ahead and type
REPEAT 4 [FORWARD 100 RIGHT 90]
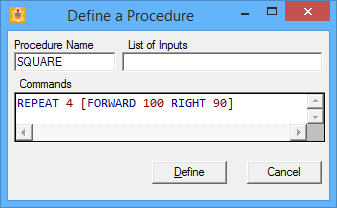 and then press Enter. Nothing
happens.
and then press Enter. Nothing
happens.
The instructions you type in the
Commands text box are remembered for later - not run immediately like
they are in the Listener window. That’s what a procedure definition is -
the plan of what to do when asked.
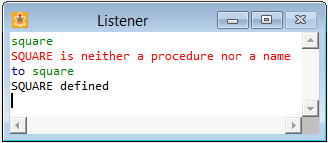
Click the Define button and you’ve just taught your first lesson! Logo
lets you know that it knows about SQUARE by displaying a message in
the Listener window.
Using Your Procedure
Once defined, your procedure is just like a Logo primitive procedure. Just type its name to run it. Type:
SQUARE
You’ll never have to type REPEAT 4 [FORWARD 100 RIGHT 90] again! Any
time you want a square, just type SQUARE. Here are some suggestions
for using your new SQUARE procedure. Try them out and then use
SQUARE in your own way.
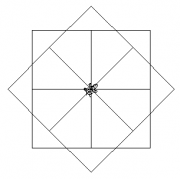
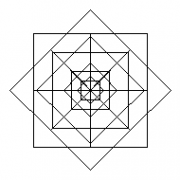
- A square is four lines and four turns. But, what is four
SQUAREand four turns? TypeREPEAT 4 [SQUARE RT 90]and see what a square of squares looks like. Change the numbers for REPEAT andRTto see what other interesting things you get. - Make a diamond. (A diamond is really just a square that’s turned sideways a little.)
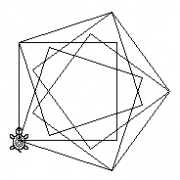
- See if you can draw a pentagon with squares.
- Make a stack of squares.
Procedure Input
All of your squares are 100 turtle steps on a side because that’s the
way you defined it. What if you want squares of 50 turtle steps? You
could change the FORWARD 100 to FORWARD 50 but then, what if you
wanted bigger squares again later? You’d have to change it back to
FORWARD 100 again. This would get old in a hurry.
You could teach Logo how to make smaller squares by defining another
procedure. It would have to have a different name, BOX for example.
Then you could draw a big square with SQUARE and a small square with
BOX. This solves one problem but creates another!
Suppose you wanted squares of 20, 50, 80 and 100 turtle steps on a side?
What names would you use to tell which was which? You could use names
like SQUARE20, SQUARE50, SQUARE80 and SQUARE100. You can easily
tell which square is which, but what are you going to do if you want to
make squares of 200 different sizes? Define 200 different procedures
with 200 different names? Absolutely not!
A square is a square no matter how big or small it is. The only
difference between them is the input to the
FORWARD command, but how can you replace
that number with any number you want, any time you want, without
changing the SQUARE procedure or making a lot of similar square
procedures? It’s simple - use an input to SQUARE so you can just type
SQUARE 100 or SQUARE 50 or use any number as the actual input.
An actual input is the input you give to a command or procedure when
you actually run it, like the number 100 in FORWARD 100. An actual
input is also called an actual parameter or actual argument.
 A formal input is used in the
definition of a procedure. It is a temporary container with a name
chosen by you. A formal input is also called a formal parameter or
formal argument. It is also called a variable because its contents
can change or vary. To add an input to your
A formal input is used in the
definition of a procedure. It is a temporary container with a name
chosen by you. A formal input is also called a formal parameter or
formal argument. It is also called a variable because its contents
can change or vary. To add an input to your SQUARE procedure, type:
TO SQUARE
The chalkboard is displayed just as you left it when you defined
SQUARE earlier. Click in the List of Inputs text box and type
SIZE. The name of an input can be anything you want, but just like a
procedure name, it should describe what it’s for. Since it’s the size of
the square that will be different each time, SIZE is a good name.
Press the Tab key (or click with the mouse) to move the cursor into the
Commands text box and replace the 100 input to
FORWARD with the name SIZE. When you
run SQUARE later on, SIZE will be automatically replaced with the
actual input you give to SQUARE. Click the Define button to save the
new definition of SQUARE.
Now you can draw squares of any size you want with just the SQUARE
command in the same way that you can draw lines of any length you want
with the FORWARD command. Just remember
to give SQUARE an input (an actual input, that is).
  TO TRIANGLE SIZE
      REPEAT 3 [FORWARD SIZE RIGHT 120]
  END
Modify other procedures to use an input or create new procedures with
inputs to draw different shapes. If you are very careful, you can
quickly create a new procedure from the definition of another procedure
that has a similar pattern of commands. For example, drawing a triangle
is similar to drawing a square - both use the
REPEAT command with
FORWARD and
RIGHT. The only differences are the number
of times to repeat and the number of degrees to turn.
You can call up the chalkboard with the SQUARE definition and then
change the Procedure Name entry to TRIANGLE, change the 4 to 3,
change the 90 to 120 and then click the Define button.
Procedure Input is Local
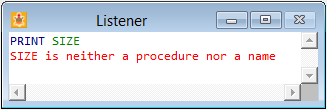
SIZE is a local variable for SQUARE. Local variables are temporary -
when SQUARE is finished, SIZE no longer exists. Type:
PRINT SIZE
Each time a procedure with a formal input is run, a new temporary variable is created in the procedure’s local environment - a kind of private workspace area in memory. The actual input value is assigned to the variable and the variable is used while the procedure is running. When the procedure ends, its local environment is no longer needed, so the memory area is released (or freed) for use by other procedures. No matter how much memory your computer has, it is a limited supply. Fortunately, Logo does this memory management for you automatically to keep your workspace (the global environment) from getting cluttered.
More Input
Your procedures can have more than one input, just like the
REPEAT command. For example, a procedure to
draw a rectangle would need two inputs because the opposite sides are
usually of a different length. The illustration shows a definition for
RECTANGLE. Go ahead and define RECTANGLE. You’ll notice that the
Define a Procedure window has been stretched to allow for the longer
lines; just click and drag an edge to adjust the size.
TO RECTANGLE HOW.TALL HOW.WIDE
    REPEAT 3 [FORWARD HOW.TALL RIGHT 90 FORWARD HOW.WIDE RIGHT 90]
END
If you give RECTANGLE the same value for both of its inputs, what will
it draw? If one procedure can completely erase another procedure’s
drawing, then both drawings must be the same thing. Can you visually
prove that a square is a special case of a rectangle?
Defining a Shortcut
A shortcut (or abbreviation) is an alternative name for a command or
procedure. Many Logo commands have shortcuts, such as FD for
FORWARD and PC for
PENCOLOR. You can define your own
shortcuts with the ALIAS command. It
takes two words as input: the first word is the name of the original
command; the second word is the name you want as the shortcut. Type:
ALIAS "RECTANGLE "REC
Now you can use REC in place of RECTANGLE. It will save some typing
while you’re exploring interactively. Don’t get carried away with
shortcuts - longer descriptive names are still important for making your
ideas clear.
Combining Procedures
A supervisor is a person in charge of other people who are called
subordinates. The supervisor directs the activities of the subordinates
so that a project runs smoothly. A similar arrangement happens when you
combine procedures to do a complicated drawing. A super procedure is in
control of subprocedures. In a way, your SQUARE procedure is a super
procedure. It controls the actions of
FORWARD and
RIGHT with the
REPEAT command to accomplish the job of
drawing a square.
A rather simple example is to draw a house of a given size by first
constructing a square frame and then adding a triangle roof. You can
define the super procedure HOUSE even though the subprocedures FRAME
and ROOF have not been written. Of course, if you try to run it,
you’ll get an error message.
The frame is just a square, so you can define FRAME easily. It may
seem silly to have a FRAME procedure since all it does is draw a
square. However, this is another case of procedure abstraction - a frame
is part of a house, but a square is just a square. Use a name that more
clearly identifies the purpose of the procedure. You could use
ALIAS in this case because FRAME is
nothing more than SQUARE, but that’s not a good idea. Later on, you
could change the design in the FRAME procedure, but you could not
change the design of the alias.
TO HOUSE SIZE
    FRAME SIZE
    ROOF SIZE
END

TO FRAME SIZE
    SQUARE SIZE
END

TO ROOF SIZE
    FORWARD SIZE
    RIGHT 30
    TRIANGLE SIZE
    LEFT 30
    BACK SIZE
END

; we have these already, they are here for completeness

TO SQUARE SIZE
    REPEAT 4 [FORWARD SIZE RIGHT 90]
END

TO TRIANGLE SIZE
    REPEAT 3 [FORWARD SIZE RIGHT 120]
END
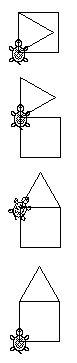 The
The ROOF procedure has to do
more than just draw a triangle. First, the turtle has to “climb” to the
top of the frame and then rotate just enough to make the triangle sit
flatly on the square. These preliminary adjustments are called a
transition. To complete the roof, the turtle should be moved back to
where it started - back on the “ground” and pointing in the same
direction. That is accomplished by doing the opposite of each
transition step in the reverse order.
Putting the
turtle back where it started makes it easier to make a sequence of
shapes. Try making a row of houses. Make a map of your neighborhood. Are
all the houses the same size and color? You can put a nameplate on each
house with the TURTLETEXT command
(TT for short). It takes either a word or a list as input and displays
the contents in uppercase starting at the turtle’s location. The text is
always displayed so you can read it properly, regardless of the turtle’s
heading. Since the text is “drawn” in the Graphics window, it uses the
current pen mode. If the pen is up, then nothing appears.