Kinderlogo Extras Activities
Color Grid
![]()
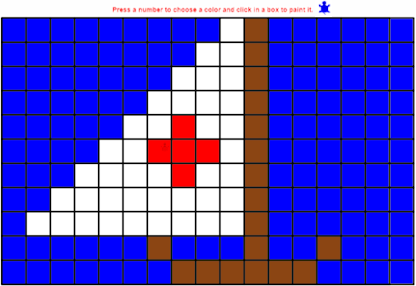
Color Grid does not use the typical single key commands to move and turn the turtle. The keyboard is used only to change the color of the pen. Children can click the mouse to fill in a box with any color they choose.
You may enjoy introducing this activity to Level 1 learners and see what pictures they create with it!
Note that there is no “Undo” command in this activity. If students fill a box by mistake, they can change the pen color to white and erase the color they used.
This activity complements the graph paper activity introduced at Level 1. Students can recreate the graph paper art they drew at that stage, complete with color. Or they can fill in boxes to create pictures they invent now.
Turns

Turns is a two-person game that helps children practice counting as they learn a little about probability.
When the game starts, each child is prompted to type his or her name and then press Enter or Return. If they click OK without entering a name, the names are “Player 1” and “Player 2”.
Note: Although this is designed as a two-person game, a child can play it alone, also taking the second player’s turn.
A game board shows the players’ names displayed at the ends of the row of squares. The turtle is in the center, pointing toward the side of the starting player (the computer randomly chooses who starts).
At the top of the window, a die rolls a random number from 1 to 6. The first player (picked randomly) moves the turtle forward the number of squares shown on the die using the F key. When the correct square is reached, the turtle turns to point the opposite way, and the second player has a turn. A player wins by moving off their side of the game board.
Here are some questions to explore with the children:
- Does the same person always win?
- Can you predict how many turns it will take to win?
- Does the person who goes first always win?
- What happens when both players roll the same number?
Memory Game

Memory Game presents 16 cards that students can click on. If you are using a device with a small screen, rotate it to portrait mode so you can see all the cards.
Eight pairs of matching cards are placed in random positions. Students click on cards and try to match the images. When the cards don’t match, the cards turn back over. If they match, they are removed from play.
There are 7 different sets of images for students to pair up.
| shapes of different colors | dominoes | animals | coins |
| food of different colors | party images | plants | |
When they finish a set, children hear a short tune. They can continue playing as long as they want.
Talk about ways to help remember the location of the cards. For example, does it help to uncover the pictures in order, from left to right on each row? Does it help to say the names of the objects when they are uncovered? What ideas do the children have about remembering the positions of the cards?
Two students can also play this game, with each player turning over two cards. Perhaps a player gets a point when they successfully match a pair, with the winner having the most points at the end. They two players can make up rules they both agree on.
Musical Keyboard
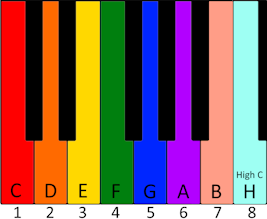
Children can explore playing music on this one-octave keyboard. They can click the notes or type the letters or numbers. (They need click on the color part of the note. If they click on a black area, no note will play, including the name of the note.)
They can play a number of songs that they know, as well as experiment with playing their phone number. Even though 9 and 0 aren’t visible, children can type those numbers on the keyboard to get the D and E that follow the high C on the keyboard.
Here are details about the songs they can play, with words and notes.
They include:
- Twinkle, Twinkle Little Star
- Mary Had a Little Lamb
- London Bridge is Falling Down
- Jingle Bells
- Baa, Baa Black Sheep
- When the Saints Go Marching In
Explore with Bee-Bot
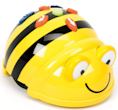
Explore with Bee-Bot is offered as a way to introduce children to Bee-Bot. Although this Bee-Bot doesn’t work in exactly the same way as the actual Bee-Bot, it does give children a way to experience the concept of moving a robot on a mat to get to a target destination. (Note that this Bee-Bot in this activity doesn’t store commands the way the actual floor robot or emulator Bee-Bot does.)
In this activity, the turtle has been given the shape of Bee-Bot. Because Bee-Bot can only turn 90 degrees at a time, the R and L commands turn that amount instead of the regular 30-degree turns that the Kinderlogo turtle makes.
There are three mats that Bee-Bot can travel on:
- Alphabet Mat
- Shapes, Colors, and Size Mat
- Community Mat
A unique feature of this Bee-Bot is that a C command places a circle at Bee-Bot’s position. This way of marking a spot is helpful if you want to give children challenges such as these.
- Spell your name by visting and marking the letters in order. (More about the Alphabet Mat)
- Mark all the green shapes. (More about the Shapes, Colors, and Size Mat)
- Mark the stops on your trip to the hardware store, the pizza shop, and the school. (More about the Community Mat)
Children can press A (for Again) to restart the mat with circles erased.
Children can press N to exit this mat and choose a different one.
You can read more about these and other mats along with lesson ideas for using them at Terrapin’s Resource website
Use the Bee-Bot Emulator
The Bee-Bot Online Emulator is a virtual Bee-Bot that mimics the physical Bee-Bot that children use on the floor.
There are many mats to choose from in the emulator.
The Bee-Bot in the emulator is different from the Kinderlogo turtle in many ways.
In the Bee-Bot emulator:
- Giving an R or L command rotates Bee-Bot 90 degrees. The Kinderlogo turtle turns 30 degrees at a time.
- When you click a command on the Bee-Bot, it doesn’t act on that command immediately. Children need to press the Go button to run the stored commands they have given Bee-Bot.
- Students need to press X to erase the commands.
- The Home button returns Bee-Bot its starting position.
- The Pause button makes Bee-Bot wait for a few seconds between commands.
- The Stop button makes Bee-Bot stop running commands.
- Check the “Talk to Me” box to hear commands spoken.
Your children will enjoy using the Bee-Bot emulator. Perhaps some Bee-Bots or Blue-Bots are in your future!