Chapter 6: Property Lists
This chapter covers properties of Logo objects and property lists in
general. You’ve been modifying properties in some way ever since you
first typed FORWARD 100 back in Chapter 1 - Beginning Turtle
Graphics. Properties are important for a full understanding of Logo
objects and how to manipulate them. You’ll learn about property lists
and create some of your own, understand about the built-in properties
and how you manipulate them, and finally, you’ll add your own property
to dress up your turtles. Before you begin, restart Logo so you have a
clean workspace.
Property Lists in General
A property list is a collection of information attached to a Logo object. Each piece of information is a separate property that has its own property name as well as a property value. Together, the property name and the property value are called a property pair - you can’t have one without the other. A property list is like a huge multi-part variable - but it’s not a variable - it’s a special type of list. To see what property lists you have in your workspace, use the PRINTOUT PLISTS command (POPLS for short). Type:
POPLS
There are no property lists in your workspace when you first start Logo. The built-in properties are not shown because they are not part of your workspace.
You create a property list with the PPROP command (it’s not short for anything, but it means ‘put a property’). PPROP takes three inputs: the name of the property list you want to create, the name of a property you want put into the property list, and the value to assign to the property name. That sounds like a lot but it’s really just the name of the property list and a property pair. Type:
PPROP "AL "FULLNAME "ALIBABA
This creates the property list with the name AL The property pair is
the property name FULLNAME along with the value ALIBABA. Type
POPLS to see your new property list:
POPLS
AL is [FULLNAME ALIBABA]
If you want to see a particular property list instead of all of them, you can use the PLIST command. It needs the name of the property list as input and outputs the property list as one long list. Type:
PLIST "AL
Result: [FULLNAME ALIBABA]
The PPROP command is also used to assign a new value to a property. In other words, you use PPROP to modify an existing property value as well as create a new property list. Type:
PPROP "AL "FULLNAME "ALABAMA
PLIST "AL
Result: [FULLNAME ALABAMA]
And, the PPROP command is also used to add additional property pairs to a property list. Type:
PPROP "AL "CAPITAL "MONTGOMERY
PLIST "AL
Result: [FULLNAME ALABAMA CAPITAL MONTGOMERY]
Now, you have one property list called AL that has two values
associated with it. One value is named FULLNAME and the other value is
named CAPITAL. You can add as many property pairs as you want to the
same property list. You’ll be adding more soon. If you had to type a
PPROP command for every property pair,
it would get tiring after a while. The
PPROPS command is a short cut for
entering more than one PPROP command at
a time. It works in the same way as
PPROP to create a new property list,
modify existing property values, or add additional property pairs.
However, it takes just two inputs: the name of the property list and a
list of property pairs. Type:
PPROPS "AK [FULLNAME ALASKA CAPITAL JUNEAU]
Because the property pairs are enclosed in a list, you do not put the quotation marks in front of the property name or the property value
- otherwise the quotation mark becomes part of the name or value and that would get very confusing.
Now, you have the beginning of a “database” of information about the states. Type:
POPLS
AK is [FULLNAME ALASKA CAPITAL JUNEAU]
AL is [FULLNAME ALABAMA CAPITAL MONTGOMERY]
Add the other states whose names begin with the letter ‘A.’ The capital of Arkansas has two words so you have to put Little Rock in as a list so it’s treated as one element of two words rather than two separate words. Type:
PPROPS "AR [FULLNAME ARKANSAS CAPITAL [LITTLE ROCK] ]
PPROPS "AZ [FULLNAME ARIZONA CAPITAL PHOENIX]
Even PPROPS would get tiring by the time you entered all fifty states. So, why not create a procedure to add states and capitals to the database? Enter this procedure:
TO NEW.STATE :ABBREVIATION :FULLNAME :CAPITAL
    PPROP :ABBREVIATION "FULLNAME :FULLNAME
    PPROP :ABBREVIATION "CAPITAL :CAPITAL
END
Although the formal inputs FULLNAME and CAPITAL are the same words
as the property names FULLNAME and CAPITAL, they are not the same
thing. Logo understands the difference in the way they are being used.
Your NEW.STATE procedure is an abstraction for creating a new state
“record” in the database. Use it to add the states whose names begin
with the letter ‘C.’ Type:
NEW.STATE "CA "CALIFORNIA "SACRAMENTO
NEW.STATE "CO "COLORADO "DENVER
NEW.STATE "CT "CONNECTICUT "HARTFORD
(Note: After creating the record for Connecticut, the shortcut for CLEARTEXT will no longer work in this workspace.) Now, there are seven state records in your database. Of course, a collection of information is not much good if you can’t get the data you need when you want it. The GPROP command outputs a property value. It needs two inputs: the name of the property list and the name of the property whose value you want. Type:
GPROP "AL "FULLNAME
Result: ALABAMA
GPROP "AL "CAPITAL
Result: MONTGOMERY
Getting data would be much easier with a procedure for each of the
properties. Define the procedures FULLNAME? and CAPITAL?:
TO FULLNAME? :ABBREVIATION
    OUTPUT GPROP :ABBREVIATION "FULLNAME
END

TO CAPITAL? :ABBREVIATION
    OUTPUT GPROP :ABBREVIATION "CAPITAL
END
Each procedure takes a state abbreviation as input and outputs the appropriate property value. The question mark at the end of the procedure names is a way to remind yourself that the procedure is asking a question and you expect it to return an answer. After your procedures are defined, type:
FULLNAME? "CT
Result: CONNECTICUT
CAPITAL? "AR
Result: [LITTLE ROCK]
Of course, you’ll want to be able to modify properties if you make a
typing mistake. Why not use the same procedure names but with a period
at the end of the name? That way, one form of your command makes a
statement while the other form asks a question. Define the procedures
FULLNAME. and CAPITAL.:
TO FULLNAME. :ABBREVIATION :FULLNAME
    PPROP :ABBREVIATION "FULLNAME :FULLNAME
END

TO CAPITAL. :ABBREVIATION :CAPITAL
    PPROP :ABBREVIATION "CAPITAL :CAPITAL
END
Since these new commands use the PPROP command, they could be used to create a new property list. Type:
FULLNAME. "DE "DELAWARE
PLIST "DE
Result: [FULLNAME DELAWARE]
Although this works, it’s best to use commands for their intended
purpose. Your NEW.STATE procedure makes sure that each new record has
two properties. Of course, you can easily fix it now with the following:
CAPITAL. "DE "DOVER
PLIST "DE
Result: [FULLNAME DELAWARE CAPITAL DOVER]
Now is a good time to save your workspace so you don’t lose all the work you’ve done. Type:
SAVE "STATES
Saving the workspace into STATES
You’re going to reload the workspace in a moment, so make sure you saved it before continuing.
Property values can be removed with the REMPROP command. It needs two inputs: the name of the property list and the name of the property to be removed. It removes the property pair identified by the property name. Type:
REMPROP "AL "CAPITAL
PLIST "AL
Result: [FULLNAME ALABAMA]
If you remove all of the property pairs in a property list, the property list itself is removed from the workspace. Type:
REMPROP "AL "FULLNAME
PLIST "AL
Result: []
It is not an error to access a property list that does not exist! The
PLIST command quietly outputs the empty
list instead of an error message. The same is true for accessing a
property name that does not exist. Type:
GPROP "AZ "BASEBALL
Result: []
You can also get rid of a property list with the ERASE command. Type:
ERASE "AK
PLIST "AK
Result: []
Now, reload your saved workspace to restore the property lists for Alabama and Alaska. Type:
LOAD "STATES
There are many properties you could add to each state’s property list -
state bird, state motto, state quarter description, and so on. It’s not
necessary, however, for each “record” in your database to have the same
properties. For example, not every state has a Major League Baseball
team but you can add a BASEBALL property to the ones that do. Define
the procedures BASEBALL? and BASEBALL.:
TO BASEBALL? :ABBREVIATION :BASEBALL
    OUTPUT GPROP :ABBREVIATION "BASEBALL
END

TO BASEBALL. :ABBREVIATION :BASEBALL
    PPROP :ABBREVIATION "BASEBALL :BASEBALL
END
Now, you can add baseball teams to records and ask if a state has any baseball teams. Type:
BASEBALL. "AZ [ARIZONA DIAMONDBACKS]
BASEBALL. "CO [COLORADO ROCKIES]
BASEBALL. "CA [A'S ANGELS DODGERS GIANTS PADRES]
You can find out which property lists have a particular property name with the GLIST command. It takes a property name as input and outputs a list of all the names of property lists that have the specified property name. Type:
GLIST "CAPITAL
Result: [CA DE AK AL AR CO CT AZ]
If you want a total count instead of the actual list, then give the output of GLIST to the COUNT command. It counts the elements in its input and outputs the number. Type:
COUNT GLIST "BASEBALL
Result: 3
In database terminology, the output of GLIST is a selection set of records. The records are selected on the basis of matching a specified property name. You can use this selection set as the input to the FOREACH command to display information about each of the selected records. The first input to FOREACH must be a list. It also needs a list of instructions to be run for each of the items in the first list. FOREACH is like a special form of the REPEAT command except that it runs the instruction list for each item in the first list instead of a specific number of times. A special substitution parameter - a quoted question mark - is used in the run list. It takes the place of each item in the first list as the instruction list is run. A couple of examples will help illustrate this. Type:
FOREACH GLIST "BASEBALL [PRINT FULLNAME? "?]
CALIFORNIA
COLORADO
ARIZONA
In this example, the output of GLIST is
the selection set [CA CO AZ] because only these three states have
baseball teams. The run list is run three times - once for each of the
elements in the selection set. The first time, CA is substituted for
the quoted question mark so that FULLNAME? outputs the full name of
California and the PRINT command prints it.
Then, CO is used which gets the full name of Colorado. And finally,
AZ gets the full name of Arizona.
The quoted question mark can be used more than one time if necessary. Type:
FOREACH GLIST "CAPITAL [(PRINT CAPITAL? "? FULLNAME? "?)]
SACRAMENTO CALIFORNIA
DOVER DELAWARE
JUNEAU ALASKA
MONTGOMERY ALABAMA
LITTLE ROCK ARKANSAS
DENVER COLORADO
HARTFORD CONNECTICUT
PHOENIX ARIZONA
In this example, the output of GLIST is
the selection set that includes all of your records because they all
have a CAPITAL property. The run list is a bit more complicated
because the quoted question mark appears two times. The parentheses
around the PRINT statement are necessary because
PRINT normally takes just one input; the
parentheses tell it that something unusual is going on - in this case,
there are two inputs to be printed.
If you create a separate property list for the state nicknames using the
state abbreviation as the property name, you can match up the states
with their nicknames in a way that is similar to a relational database.
Create the NICKNAME property list with the following commands. You can
add more nicknames later.
PPROP "NICKNAME "AZ [GRAND CANYON STATE]
PPROP "NICKNAME "CA [THE GOLDEN STATE]
PPROP "NICKNAME "CO [CENTENNIAL STATE]
Create the NICKNAME? procedure:
TO NICKNAME? :ABBREVIATION :BASEBALL
    OUTPUT GPROP :ABBREVIATION "NICKNAME
END
Now, even though the nicknames are not part of the states’ property lists, you can still use the information from both property lists at the same time. Suppose you want to know the nickname of each state that has a baseball team. Here is a way to do it:
FOREACH GLIST "BASEBALL [PRINT NICKNAME? "?]
THE GOLDEN STATE
CENTENNIAL STATE
GRAND CANYON STATE
In this example, the selection set is the list of three states with
baseball teams. Each of the state abbreviations is then used by
NICKNAME? to print the nickname. Suppose you want the full name along
with the nickname. Type:
FOREACH GLIST "BASEBALL [(PRINT FULLNAME? "? NICKNAME? "?)]
CALIFORNIA THE GOLDEN STATE
COLORADO CENTENNIAL STATE
ARIZONA GRAND CANYON STATE
If you continue adding new states and more properties, you’ll have a
solid database on which to build projects about the states. Try using a
map of the states and then create a property called XY that
approximates the location of each capital. Create a trivia game about
the states. Don’t forget to save your work. Type:
SAVE "STATES
Create procedures to manipulate your properties. It’s much clearer than using the property list commands directly. Of course, you still need them inside the procedures. In fact, many of the built-in Logo commands are really an abstraction of property list manipulations. For example, PENUP picks up the turtle’s pen, but you probably didn’t know that behind the scenes, Logo was doing something like the following command for you:
FOREACH .WHO [PPROP "? "PENSTATE "PENUP]
Aren’t you glad that the abstract PU does the same thing? It’s so much
more of a shortcut than you ever thought! Pretty sneaky, huh?
Property List Editors

You can edit property values with the EDP command. It takes the name of a property list as input and displays a window with a two-column table of property pairs. Type:
EDP "CO
The Properties of CO window is displayed showing each property name and its value. Click in the text box of the value you want to modify and type a new value. Click on the OK button to accept the changes or click on the Cancel button if you change your mind. If you use the Logo text editor, your property lists are shown as PPROPS commands - one very long instruction to define the property list. That’s how property lists are saved in your workspace file so they can be rebuilt when you reload your workspace. It’s not the easiest way to view or edit property lists, but you can use it if you want.
The EDP command always displays your property lists in the two-column window format. The property lists for turtles are a different story. The format you see for turtle properties depends on the setting of the Extended Property Lists option in the Preferences dialog of the Edit menu.
Click on the Preferences menu and select Operation… to display the
Operation Preferences dialog.
In the middle, you’ll see a checkbox labeled Extended Property Lists.
By default, the box is not checked. Make sure it is not checked now.
Click OK to close the Preferences dialog.
Move the mouse pointer over the turtle and right-click (on a PC) or Ctrl-click (on a Mac). This action displays the Turtle Center for TURTLE.0 dialog - a special property editor for turtles. (The turtle name in the title depends on which turtle you select.) The Turtle Center allows you to modify some of the turtle properties by clicking on the controls or entering new values in the text boxes. You should be familiar with most of the properties and how they work as well as the commands that you’ve used to modify them. If you change a property value and then click on the OK button, the changes will take effect in the same way as if you had typed in the commands in the Listener. For example, removing the check mark in the Show Turtle checkbox will cause the turtle to hide after you click the OK button.
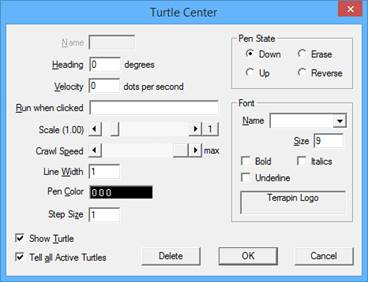
The textbox labeled Run when clicked is for the turtle’s RUN
property. The commands you put in the RUN property are run in the same
way as if you had typed them in the Listener when you click on the
turtle. They will apply to all of the active turtles. If you want the
commands to apply to a specific turtle, then consider using the
ASK command.

Be careful with the checkbox in the lower left corner of the Turtle
Center for TURTLE.0 dialog - the one labeled Tell all active turtles.
If you put a checkmark in that box, then the changes you make to the
turtle properties are applied to all of the active turtles. Click on
Cancel to close the Turtle Center for TURTLE.0 without making any
changes.
Now, go back to the Preferences dialog
and put a checkmark in the Extended Property Lists option and
click the OK button. Move the mouse pointer over the turtle and
right-click (on a PC) or Ctrl-click (on a Mac).
The
property list for the turtle is now displayed in the same two-column
format as your own property lists. There are more properties shown in
the extended property list than in the Turtle Center dialog. Most of
them are still familiar - except the SIZE and RUN2 properties.
 The turtle’s size is normally 31
by 31 dots. The SETTURTLESIZE or
The turtle’s size is normally 31
by 31 dots. The SETTURTLESIZE or
SETTSIZE command changes the turtle size by scaling both the width and
the height of the turtle. For example, SETTSIZE 2 is the same as
setting the SIZE property to 62 by 62. The width and height of a
turtle do not have to be the same but the
SETTURTLESIZE command keeps them
the same. You can have fun stretching your turtle - make it short and
wide or tall and narrow. Try using a size of 15 by 300 and then
STAMP a secret message.
It’s hard to read until you look at it at a very shallow angle. Some
fonts work better than others. Rotating a stretched turtle will probably
not look like what you wanted - try using the arrow shape. The RUN2
property works in a similar way to the RUN property. However, the
commands are run when you double click on the turtle. You can put
commands in either the 'RUN or the RUN2 property but not
both.
 Click on the Turtle Center button in
the button bar. This is another property editor but it is not affected
by the Extended Property Lists option in the Preferences dialog. It
looks very much like the dialog for a specific turtle - except the
Turtle name field is not available for change.
Click on the Turtle Center button in
the button bar. This is another property editor but it is not affected
by the Extended Property Lists option in the Preferences dialog. It
looks very much like the dialog for a specific turtle - except the
Turtle name field is not available for change.
Be careful with the checkbox labeled Tell all active turtles - it is
checked when you call up the dialog. If you remove the checkmark, then
the changes you make will apply to the first turtle in the
WHO list - usually that’s turtle number 0 but
turtle names could change that.
The property list editors are convenient while you’re exploring. Most of the time, you will want to make sure that Extended Property Lists is not checked. This will give you quick access to the most common properties. In a procedure, however, you have to use either the built-in Logo commands that modify the properties or use the property list commands. They’re not so bad, really.
Your Own Turtle Properties
You can add properties to any property list. It’s a convenient way to keep track of information, especially for lots of turtles. Suppose you want to dress up a turtle and put on a fashion show? First, you have to buy clothes for the turtle and put them in a wardrobe. Then, you can begin the show and watch as the turtle tries on each outfit.
 Or, suppose you want to disguise a
turtle and send it on a secret mission? First, you have to issue the
disguises and put them in a backpack. Then, you can start the mission
and watch as the turtle changes its identity.
Or, suppose you want to disguise a
turtle and send it on a secret mission? First, you have to issue the
disguises and put them in a backpack. Then, you can start the mission
and watch as the turtle changes its identity.
The turtle’s property list is a good place to put the wardrobe or the backpack. And, what’s good for the one turtle is good for the many turtles you might want to include later on in your fashion show or on your secret mission. Since each turtle has its own property list, then each turtle can have its own wardrobe or backpack. There won’t be any confusion - even with lots of turtles - because property is privately owned.
So, which one do you want to do - the fashion show or the secret mission? It doesn’t really matter because they are the same thing! It just depends on how you think about it. Sure, the idea is different, but the concept is the same. Pick the one you want, try it out, and then try the other one. You’ll see that only the names have been changed to protect the ideas - in a moment, the concept will become your own.
A Turtle Fashion Show
Buying clothes for a turtle is just a matter of selecting turtle shapes and putting their names in a list. The wardrobe is the name of a property and the clothes are the property value. Here is a procedure for buying clothes and putting them away:
TO BUY :TURTLE :CLOTHES
    PPROP :TURTLE "WARDROBE :CLOTHES
END
To buy clothes for turtle number 0, type:
BUY 0 [TURTLE TURTLE1]
The fashion show is really just the turtle setting its shape to an outfit in the wardrobe, waiting a while to show it off, and then doing the same thing for each of the outfits. Here is a procedure for the fashion show:
TO FASHION.SHOW :TURTLE :WARDROBE
    FOREACH :WARDROBE [ASK :TURTLE [SETSHAPE "? WAIT 2000]]
    FASHION.SHOW :TURTLE :WARDROBE
END
You could use this procedure directly in the Listener. However, the
WARDROBE input has to be the list of clothes and you wouldn’t want to
type it again. Furthermore, you could use the
LAUNCH command to make the fashion show run
in the background so you can continue playing around. But then, when you
want to stop the show, you have to remember the process identification
number that is output by the LAUNCH command
so you can give it to the HALT command.
Otherwise, you’ll have to press the Red Traffic Light button which stops
everything!
No problem - define the following procedure to begin the show. The
PPROP command is one long line that does
a lot of things. It creates a new turtle property called ID that will
contain the process identification number that is output by
LAUNCH. The
LAUNCH command runs the list of
instructions built by LIST which usually
takes just two inputs. The parentheses are required because the list
will contain three elements: the word FASHION.SHOW, the turtle number,
and the list of clothes from the wardrobe.
TO BEGIN.SHOW :TURTLE
    PPROP :TURTLE "ID LAUNCH
        (LIST "FASHION.SHOW :TURTLE
            GPROP :TURTLE "WARDROBE)
END
You can begin the fashion show for turtle number 0 with the following instruction:
BEGIN.SHOW 0
Since the show is running in the background, you can do other commands while its running. For example, start another fashion show with turtle number 1:
ASK 1 [PU ST FD 50]
BUY 1 [TURTLE2 TURTLE3]
BEGIN.SHOW 1
The following procedure can be used to stop a turtle’s fashion show. The
process identification number needed for the
HALT command is the value of the turtle’s
property called ID.
TO END.SHOW :TURTLE
    HALT GPROP :TURTLE "ID
END
To stop the shows, type:
END.SHOW 0
END.SHOW 1
Save your workspace so you can keep this example. You may not always want a fashion show, but the concepts of animating a turtle are worth having around for other ideas.
A Turtle Secret Mission
Issuing disguises for a turtle is just a matter of selecting turtle shapes and putting their names in a list. The backpack is the name of a property and the disguises are the property value. Here is a procedure for issuing disguises and packing them away:
TO ISSUE :TURTLE :DISGUISES
    PPROP :TURTLE "BACKPACK :DISGUISES
END
To issue disguises for turtle number 0, type:
ISSUE 0 [TURTLE TURTLE1]
The secret mission is really just the turtle setting its shape to a disguise from the backpack, waiting a very short time, and then doing the same thing for each of the disguises. Here is a procedure for the secret mission:
TO SECRET.MISSION :TURTLE :BACKPACK
    FOREACH :BACKPACK [ASK :TURTLE [SETSHAPE "? WAIT 100]]
    SECRET.MISSION :TURTLE :BACKPACK
END
You could use this procedure directly in the Listener. However, the
:BACKPACK input has to be the list of disguises and you wouldn’t want
to type it again. Furthermore, you could use the
LAUNCH command to make the secret mission
run in the background so you can continue playing around. But then, when
you want to terminate (or end) the mission, you have to remember the
process identification number that is output by the
LAUNCH command so you can give it to the
HALT command. Otherwise, you’ll have to press
the Red Traffic Light button which stops everything!
No problem - define the following procedure to begin the secret mission.
The PPROP command is one long line
that does a lot of things. It creates a new turtle property called ID
that will contain the process identification number that is output by
LAUNCH. The
LAUNCH command runs the list of
instructions built by LIST which usually
takes just two inputs. The parentheses are required because the list
will contain three elements: the word SECRET.MISSION, the turtle
number, and the list of disguises from the backpack.
TO BEGIN.MISSION :TURTLE
    PPROP TURTLE "ID LAUNCH
        (LIST "SECRET.MISSION :TURTLE
            GPROP :TURTLE "BACKPACK)
END
You can begin the secret mission for turtle number 0 with the following instruction:
BEGIN.MISSION 0
Since the mission is running in the background, you can do other commands while its running. For example, start another secret mission with turtle number 1:
ASK 1 [PU ST FD 50]
ISSUE 1 [TURTLE2 TURTLE3]
BEGIN.MISSION 1
The following procedure can be used to stop a turtle’s secret mission.
The process identification number needed for the
HALT command is the value of the turtle’s
property called ID.
TO END.MISSION :TURTLE
    HALT GPROP :TURTLE "ID
    PPROP :TURTLE "ID -1
END
To stop the missions, type:
END.MISSION 0
END.MISSION 1
Save your workspace so you can keep this example. You may not always need to send a turtle on a secret mission, but the concepts of animating a turtle are worth having around for other ideas.